

Introduction
In this article, we will learn to bind, insert, update and delete the data, using MVC and Entity Framework. I am new in MVC, I've worked enough in Web forms but now, I just switched to MVC. Thus, I'm trying to learn it step by step. I am taking my friend's help in this and after his help, I will try to create a simple add update Application in MVC, which I will share with you people, so that those who are new in MVC like me can help themselves out, if they are stuck somewhere. Thus, let's not waste time and start developing our Web Application.
In this article, we will learn to bind, insert, update and delete the data, using MVC and Entity Framework. I am new in MVC, I've worked enough in Web forms but now, I just switched to MVC. Thus, I'm trying to learn it step by step. I am taking my friend's help in this and after his help, I will try to create a simple add update Application in MVC, which I will share with you people, so that those who are new in MVC like me can help themselves out, if they are stuck somewhere. Thus, let's not waste time and start developing our Web Application.
Description
First, we will create a table, in which we want to insert our data from the Web Application. Before that, we will create a database first, write the query, given below to do this, using GUI.
First, we will create a table, in which we want to insert our data from the Web Application. Before that, we will create a database first, write the query, given below to do this, using GUI.
- Create Databse

Write the query, given above and execute the query. It will create our database now. We need to create a table, write the query, given below- - Create Table

Execute the query, given above and it will create the table in our database. Now, our table is ready. Thus, let's start with our code section. Now, follow the following steps in your Visual Studio to create a new MVC project. - Create new project
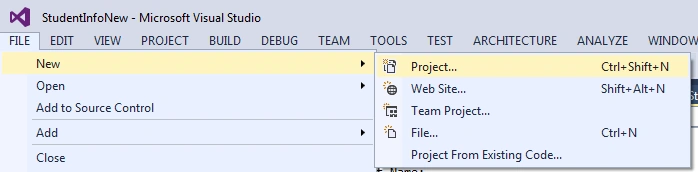
Now, it will ask you, what kind of Application, you want to create, you have to choose MVC, as given below:
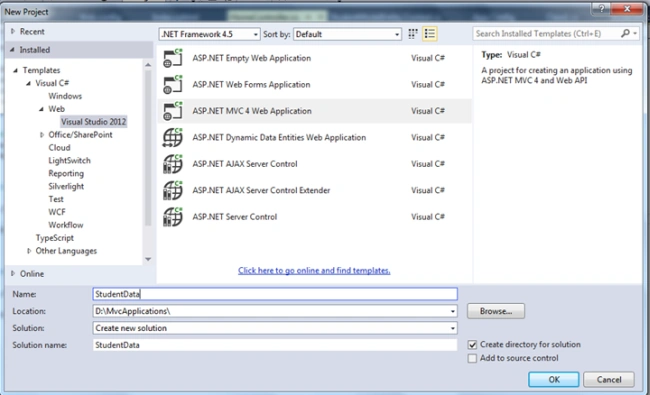
You can see in the image, shown above, that we give the name for this Application and the location, where we want to store this Application. Now, it will ask us about the template, we want to use, as given below-
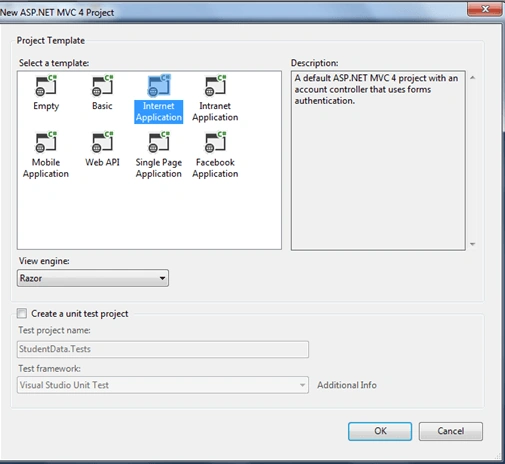
We choose Internet template, because it will give us some default build in Home control and view like Home, AboutUs etc. and also some scripts, which we can use for the validation. You can use other templates also, but here we will do this with this template.
We choose Internet template, because it will give us some default build in Home control and view like Home, AboutUs etc. and also some scripts, which we can use for the validation. You can use other templates also, but here we will do this with this template.
Now, we will create a new Class Library. Using Entity Framework, we can create this with the same project, we created. To make it clean, we will create this outside this template. Let's see how to add:
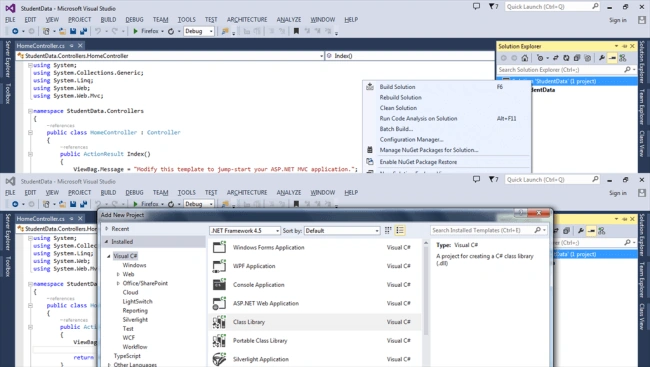
Right click on the solution, add new project, select Class Library, name it StudentDataEntity, add a folder within it and name that folder as StudentModel. Now, we will add Entity Framework within this folder, right click on the folder, add new item and select the data from left side and select Entity Model like image, given below-
Right click on the solution, add new project, select Class Library, name it StudentDataEntity, add a folder within it and name that folder as StudentModel. Now, we will add Entity Framework within this folder, right click on the folder, add new item and select the data from left side and select Entity Model like image, given below-
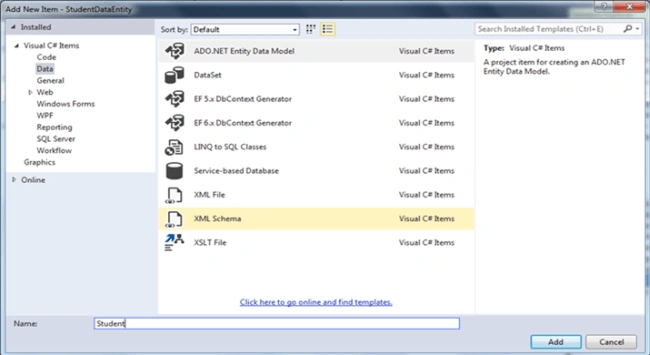
Second Image is given below-
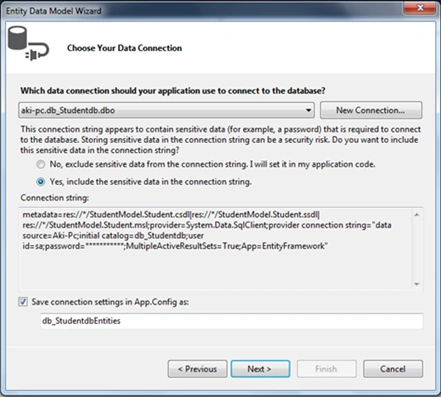
Now, select the object, you want to use through this Entity Framework.
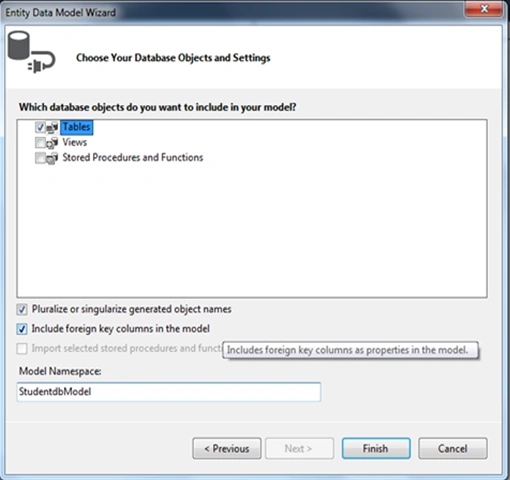
Now, build this and after this, add this Library reference to our Application.
Now, build this and after this, add this Library reference to our Application.
After adding the reference to your Application, you will see App.Config file in Entity Library. From the file, cut the connection string and add this into your Web.Config file. Now, we start coding. Go to your Home controller and open index from view folder, remove everything from index view page. We will add an anchor link out there to insert the data in the database.
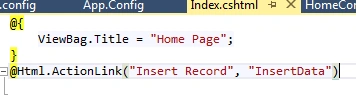
Using HTML Helper class, we will create an anchor link here, and now, we will create InsertData action in Home Controller. Now, we will create an Action to insertData and we will create view for inserting Data.
- public ActionResult InsertData()
- {
- return View();
- }
- @model StudentDataEntity.StudentModel.tbl_Students
- @{
- ViewBag.Title = "InsertData";
- Layout = "~/Views/Shared/_Layout.cshtml";
- }
- <h2>InsertData</h2>
- @ViewBag.Success
- @using (Html.BeginForm("InsertData","Home",FormMethod.Post)) {
- @Html.AntiForgeryToken()
- @Html.ValidationSummary(true)
- <fieldset>
- <legend>tbl_Students</legend>
- <div class="editor-label">
- @Html.LabelFor(model => model.Firstname)
- </div>
- <div class="editor-field">
- @Html.EditorFor(model => model.Firstname)
- @Html.ValidationMessageFor(model => model.Firstname)
- </div>
- <div class="editor-label">
- @Html.LabelFor(model => model.Lastname)
- </div>
- <div class="editor-field">
- @Html.EditorFor(model => model.Lastname)
- @Html.ValidationMessageFor(model => model.Lastname)
- </div>
- <div class="editor-label">
- @Html.LabelFor(model => model.Class)
- </div>
- <div class="editor-field">
- @Html.EditorFor(model => model.Class)
- @Html.ValidationMessageFor(model => model.Class)
- </div>
- <div class="editor-label">
- @Html.LabelFor(model => model.Section)
- </div>
- <div class="editor-field">
- @Html.EditorFor(model => model.Section)
- @Html.ValidationMessageFor(model => model.Section)
- </div>
- <div class="editor-label">
- @Html.LabelFor(model => model.Rollnumber)
- </div>
- <div class="editor-field">
- @Html.EditorFor(model => model.Rollnumber)
- @Html.ValidationMessageFor(model => model.Rollnumber)
- </div>
- <div class="editor-label">
- @Html.LabelFor(model => model.IsActive)
- </div>
- <div class="editor-field">
- @Html.EditorFor(model => model.IsActive)
- @Html.ValidationMessageFor(model => model.IsActive)
- </div>
- <p>
- <input type="submit" value="Create" />
- </p>
- </fieldset>
- }
- <div>
- @Html.ActionLink("Back to List", "Index")
- </div>
- @section Scripts {
- @Scripts.Render("~/bundles/jqueryval")
- }
We used model class, given above and used its properties to create a form and in the form, we mentioned the Action Name and Controller Name and method to submit the form data. You can see that, we have mentioned the same Action Name in the form, but we can't have the same action name with the same parameter, but we can create POST or we can use Method Overloading concept in this. Here, we will create an Action with the POST type and will use Entity Framework and LINQ to insert the data.
- [HttpPost]
- public ActionResult InsertData(tbl_Students objStudent)
- {
- if(ModelState.IsValid)
- {
- objContext.tbl_Students.Add(objStudent);
- objContext.SaveChanges();
- if(objStudent.id>0)
- {
- ViewBag.Success = "Inserted";
- }
- ModelState.Clear();
- }
- return View();
- }
That's it, we write the code to Insert Data into Table. Let's run the code and check if this work or not.
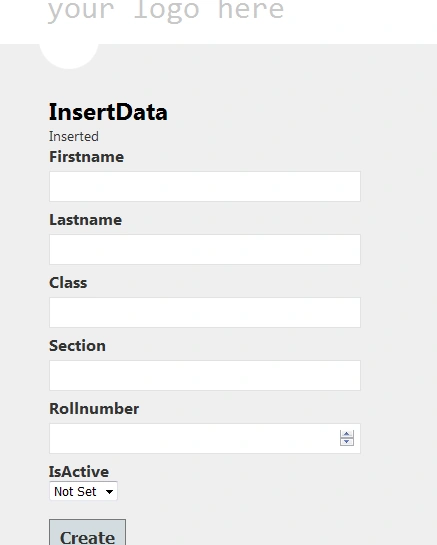
Our form is ready. If we fill the data and it will be all aved in database, you will get the message inserted the way, you can see, given in the form, above. Thus, our next step will be to insert the data. Now, we need to bind this data, so we will write the code in Index Action and in Index View. Let's do this, as follows-
- public ActionResult Index()
- {
- var objStudentList = objContext.tbl_Students.ToList();
- return View(objStudentList);
- }
- @model IEnumerable<StudentDataEntity.StudentModel.tbl_Students>
- @{
- ViewBag.Title = "Home Page";
- }
- @Html.ActionLink("Insert Record", "InsertData")
- <table>
- <thead>
- <tr>
- <th>Firstname</th>
- <th>Lastname</th>
- <th>Class</th>
- <th>Section</th>
- <th>Rollnumber</th>
- <th>IsActive</th>
- <th>Action</th>
- </tr>
- </thead>
- <tbody>
- @foreach(var student in Model){
- <tr>
- <td>
- @student.Firstname
- </td>
- <td>
- @student.Lastname
- </td>
- <td>
- @student.Class
- </td>
- <td>
- @student.Section
- </td>
- <td>
- @student.Rollnumber
- </td>
- <td>
- @student.IsActive
- </td>
- <td>
- @Html.ActionLink("Edit", "EditStudent", new {[email protected] })|@Html.ActionLink("Delete", "DeleteStudent", new { studentid = @student.id })
- </td>
- </tr>
- }
- </tbody>
- </table>
Now, the time has come to check if it's working or not.
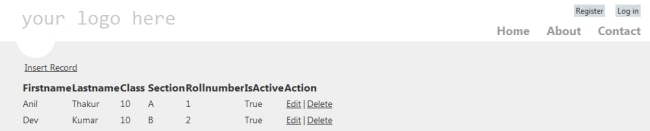
Thus, data is bound nicely. Hence, we already learned how we can insert and bind the data. Now, we just need to learn, how we can update and delete in MVC. Thus, on edit button, you can see that, we have given an Action Name (EditStudent), so we will create an Action Now Edit Student, as follows-
Thus, data is bound nicely. Hence, we already learned how we can insert and bind the data. Now, we just need to learn, how we can update and delete in MVC. Thus, on edit button, you can see that, we have given an Action Name (EditStudent), so we will create an Action Now Edit Student, as follows-
- public ActionResult EditStudent(Int32 studentid)
- {
- var Studentdata = objContext.tbl_Students.Where(x => x.id == studentid).FirstOrDefault();
- if(Studentdata!=null)
- {
- TempData["StudentID"] = studentid;
- TempData.Keep();
- return View(Studentdata);
- }
- return View();
- }
We created an Action with the name EditStudent and passed Id in it. Using LINQ query, we get the details of the student. Now, we will create the view, same as Insert view and we just have to change the action name in form.
- @model StudentDataEntity.StudentModel.tbl_Students
- @{
- ViewBag.Title = "EditStudent";
- Layout = "~/Views/Shared/_Layout.cshtml";
- }
- <h2>EditStudent</h2>
- @using (Html.BeginForm("EditStudent","Home",FormMethod.Post)) {
- @Html.AntiForgeryToken()
- @Html.ValidationSummary(true)
- <fieldset>
- <legend>tbl_Students</legend>
- @Html.HiddenFor(model => model.id)
- <div class="editor-label">
- @Html.LabelFor(model => model.Firstname)
- </div>
- <div class="editor-field">
- @Html.EditorFor(model => model.Firstname)
- @Html.ValidationMessageFor(model => model.Firstname)
- </div>
- <div class="editor-label">
- @Html.LabelFor(model => model.Lastname)
- </div>
- <div class="editor-field">
- @Html.EditorFor(model => model.Lastname)
- @Html.ValidationMessageFor(model => model.Lastname)
- </div>
- <div class="editor-label">
- @Html.LabelFor(model => model.Class)
- </div>
- <div class="editor-field">
- @Html.EditorFor(model => model.Class)
- @Html.ValidationMessageFor(model => model.Class)
- </div>
- <div class="editor-label">
- @Html.LabelFor(model => model.Section)
- </div>
- <div class="editor-field">
- @Html.EditorFor(model => model.Section)
- @Html.ValidationMessageFor(model => model.Section)
- </div>
- <div class="editor-label">
- @Html.LabelFor(model => model.Rollnumber)
- </div>
- <div class="editor-field">
- @Html.EditorFor(model => model.Rollnumber)
- @Html.ValidationMessageFor(model => model.Rollnumber)
- </div>
- <div class="editor-label">
- @Html.LabelFor(model => model.IsActive)
- </div>
- <div class="editor-field">
- @Html.EditorFor(model => model.IsActive)
- @Html.ValidationMessageFor(model => model.IsActive)
- </div>
- <p>
- <input type="submit" value="Save" />
- </p>
- </fieldset>
- }
- <div>
- @Html.ActionLink("Back to List", "Index")
- </div>
- @section Scripts {
- @Scripts.Render("~/bundles/jqueryval")
- }
Now, we have to create an Action with HTTP Post EditStudent and will pass the model in it, as given below-
- [HttpPost]
- public ActionResult EditStudent(tbl_Students objStudnet)
- {
- Int32 StudentId = (int)TempData["StudentId"];
- var StudentData = objContext.tbl_Students.Where(x => x.id == StudentId).FirstOrDefault();
- if(StudentData!=null)
- {
- StudentData.Firstname = objStudnet.Firstname;
- StudentData.Lastname = objStudnet.Lastname;
- StudentData.Rollnumber = objStudnet.Rollnumber;
- StudentData.Class = objStudnet.Class;
- StudentData.IsActive = objStudnet.IsActive;
- objContext.Entry(StudentData).State = EntityState.Modified;
- objContext.SaveChanges();
- }
- return RedirectToAction("Index");
- }
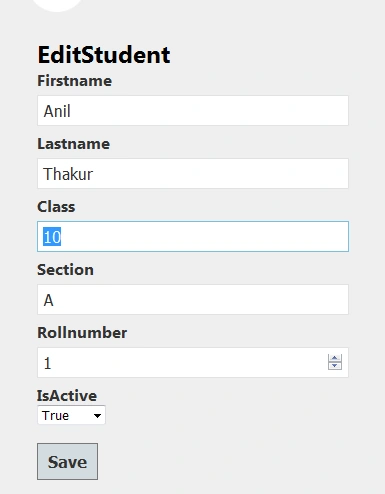
Now, we are left with Delete only. Thus, let's create an Action for Delete now.
- public ActionResult DeleteStudent(int studentid)
- {
- if (studentid > 0)
- {
- var studentbyid = objContext.tbl_Students.Where(x => x.id == studentid).FirstOrDefault();
- if (studentbyid != null)
- {
- objContext.Entry(studentbyid).State = EntityState.Deleted;
- objContext.SaveChanges();
- }
- }
- return RedirectToAction("Index");
- }
Tushar MahajanPosted Jan 1, 2019, 2:02 AM
This code is very good,its help me the most during my coding
Hitanshi MehtaPosted Aug 9, 2018, 3:50 PM
It's damn good! Thank you!!!
Muhammad AsadPosted Apr 8, 2018, 6:20 PM
Run The Edit Page and Show Error : Exception Details: System.ArgumentException: The parameters dictionary contains a null entry for parameter 'id' of non-nullable type 'System.Int32' for method 'System.Web.Mvc.ActionResult Update(Int32)' in 'Project.Controllers.HomeController'. An optional parameter must be a reference type, a nullable type, or be declared as an optional parameter.Parameter name: parameters
Muhammad AsadPosted Apr 8, 2018, 6:12 PM
How to SOlve This Error System.NullReferenceException: 'Object reference not set to an instance of an object.'
sangeetha kPosted Apr 4, 2018, 6:52 AM
An exception of type 'System.InvalidOperationException' occurred in EntityFramework.dll but was not handled in user codeAdditional information: The entity type DbQuery`1 is not part of the model for the current context.
sangeetha kPosted Apr 4, 2018, 6:51 AM
It leads error in delete query
Vignesh ManiPosted Aug 30, 2016, 8:38 AM
NIce one
Delpin Susai RajPosted Aug 30, 2016, 3:34 AM
Nice share
Humayun Kabir MamunPosted Aug 30, 2016, 3:20 AM
Nice...
Rohit AiriPosted Aug 30, 2016, 12:24 AM
Nice share keep it up sir
Pradeep SahooPosted Aug 29, 2016, 10:17 AM
Good share