

ISAPI Applications & filters, APP domain, HTTPs & SSLs, Difference between Web farms & Web Gardens, Network Load Balancing, General understanding for Active Directory and Users Creation
In this article we will have a look at ISAPI filters in windows SharePoint services.
So let’s get started.
ISAPI Applications
ISAPI Applications consists of two components –Filters & Extensions. These ISAPI applications can be developed using any tool provided that should generate Windows dll.
Extensions and filters are compiled into dll files to run on servers.
ISAPI Filters
ISAPI stands for Internet Server Application Programming Interface registered at either site or global level.ISAPI filters are the set of program/DLL files which are registered with IIS to modify the behavior of a Web Server.ISAPI filter manage paths and filters both incoming and outgoing streams of data until they find one they need to process. The request is redirected by the ISAPI filter to the Windows SharePoint Services ISAPI extension or the filter which will allow .aspx pages or .asmx pages to the SharePoint ASP.NET handler.
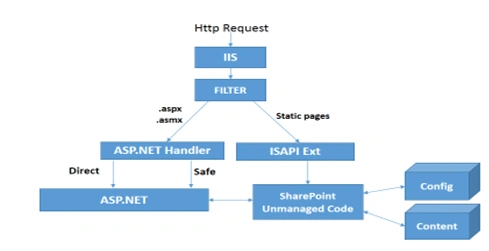
Fig-1 represents the request handled in IIS and ISAPI filter.
ISAPI Extensions
ISAPI Extensions have access to all the functionalities of IIS.These extensions are loaded into a process controlled by IIS.The extensions can be accessed like static HTML pages.
APP Domain
App domain stands for Application Domain. It is a logical container or boundary which isolates the code/data inside a secure boundary. There are some benefits of app domain which are as follows:-
- Consider two applications, if fault occurs in one application it will not affect other applications.
- Individual applications can be stopped without interrupting the entire process.
- Managing permissions to code can be controlled by app domain in which the code is running.
- App Domain provides Application Security.
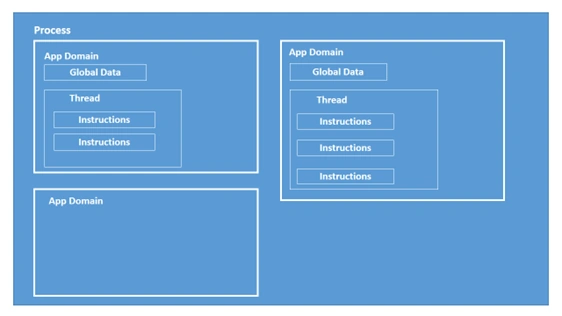
Fig-2 represents an App Domain.
HTTPs & SSLs
Https are used for the sites to encrypt or decrypt user page requests as well as the pages that are returned by the web server. They acquire secure environment for data to transfer information over web. This http uses secure socket layer as a sub layer. An SSL Connection between client & server is set up. Once the connection is established the messages are send securely to each other.
The https pages will contain a public & private key. If the private key is available only the pages can be encrypted or decrypted. An authenticated website has a unique personal certificate purchased from CA’s (Certificate Authority) like Go Daddy, GeoTrust & VeriSign.
Client makes a request to the server over HTTPS. Server sends a copy of its SSL certificate + public key. After verifying the identity of the server with its local trusted CA store, client generates a secret session key, encrypts it using the server's public key and sends it. Server decrypts the secret session key using its private key and sends an acknowledgment to the client. Hence a secure channel will be established.
Brief Explanation of SSL
Below points will give a brief idea about SSLs as follows,
- Using certificates to authenticate. Server certificate is a must and client certificate is optional (only when the server requests it). A certificate is like something to prove who you are and it also contains a public key for asymmetric encryption.
- Using asymmetric encryption (with public key in the server certificate) to establish a shared symmetric keywhich is used to transfer data between client and server securely by symmetric encryption (for performance reason because symmetric encryption is faster than asymmetric encryption).
- The shared symmetric key is established by exchanging a premaster secret from client side (encrypted with server public key) and is derived from the pre-master secret together with client random and server random.
- HTTPS URLsbegin with "https://" and use port443 by default, whereas HTTP URLs begin with "http://" and use port 80 by default.
- HTTP is not encrypted and is vulnerable to man-in-the-middle and eavesdropping attacks, which can let attackers gain access to website accounts and sensitive information, and modify webpages to inject malwareor advertisements.
- HTTPS is designed to withstand such attacks and is considered secure against them (with the exception of older, deprecated versions of SSL).
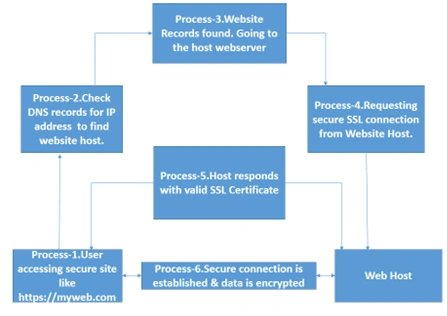
Fig-3 represents work of Https using SSLs.
Difference between Web Farms & Web Gardens
Web Farms
- Web Farms can be defined as multiple machines working as a server and assigned with different roles & housed together in a single location.
- These are also known as server clusters.
- Web farms provides high availability, if any of the servers goes down, load balancer redirects request to other servers.
- Web farms are normally applied where heavy request & processing loads are expected to be more. These are used in enterprise environments which enhances the performance of the entire system.
- In a web farm two or more webservers consist of same kind of contents which are of same configuration.
- The request is received by switching/routing logic & decides from which webserver the farm handles the request.
- Web Farm Framework includes some built-in management infrastructure that allows you to check on the health of a server, and track its status.
- The Web Farm Framework also supports a “Server Farm Operations” task link within the IIS Admin Tool which can be used to easily run commands across the server farm.
- Web Farm uses the Microsoft Web Deploy technology to enable application deployment in an automated fashion.
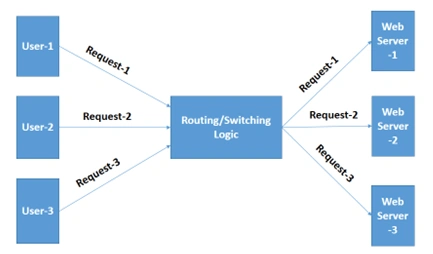
Fig-4 represents a web farm.
Web Gardens
- Web Gardens can be defined as a single machine with multiple roles/Application which contains the multiple worker process.
- Web Gardens are normally applied where request & processing loads are expected to be not high.
- For example, a Web Server machine can itself acts as a Database Server & SMTP server.
- A Web Garden has single worker process for the IIS Service, a garden has one worker process per CPU, and thereby boosting performance. It prevent the use of session state in the process. So in state full application you have another performance penalty to serialize the state to an external store.
- Application can be swapped out based on preference & tag settings by using processor affinity.
- Different worker process receives request & the session mode is made as out process session mode.
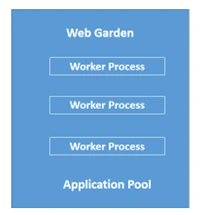
Fig-5 represents a Web Garden.
Network Load Balancing
- Network load balancing is a service for windows 2012 server.
- It acts as a single point of contacts for clients.
- It gives a common virtual machine name to all the web servers present in an organization. Suppose if 10 machines are used in NLB then all the 10 machines would have the same virtual name and all of them share the load.
- It sends a new request to server with the least load.
- A Network Load Balancer functions at the fourth layer of the Open Systems Interconnection (OSI) model.
- It can handle millions of request per second.
- It distributes network traffic among multiple servers or virtual machines within a cluster to avoid overloading any one host and improve performance.
- Systems administrators and networking administrators can manage the Network Load Balancing feature through Microsoft's NLB Manager or with PowerShell cmdlets.
- NLB allows all of the computers in the cluster to be addressed by the same set of cluster IP addresses, and it maintains a set of unique, dedicated IP addresses for each host.
- It helps to detect and recover from a cluster host that fails or goes offline.
- Balances the network load when hosts are added or removed.
- NLB recover and redistribute the workload within ten seconds.
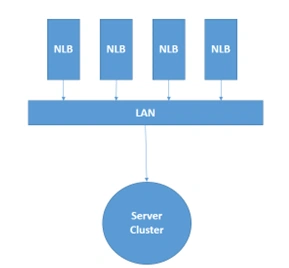
Fig-6 represents a Network Load balancer.
Active Directory & User Creation
Active Directory is a set of processes and services which act as a centralized domain management. It is developed by Microsoft which authenticates & authorizes users in a Windows domain network. Suppose when a user logs into a computer, Active Directory determines whether the user is a System administrator or normal user by authenticating the submitted password.
Steps to create Users account in Active Directory
Follow the below steps to create user in active directory.
Step 1
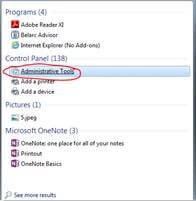
Click on start and select administrative tools as shown in the below figure.
Step2
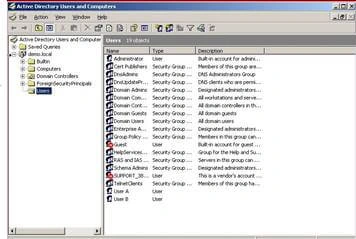
Select Active directory Users & Computers as shown below,
Step-3
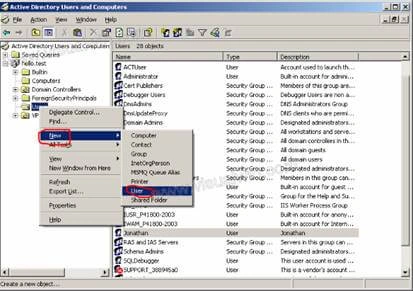
Right click on the folder you want to add user .Point to new and click on User. Below screen will appear
Step4
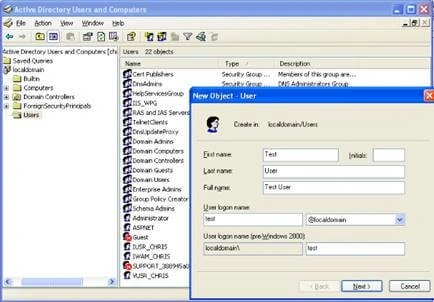
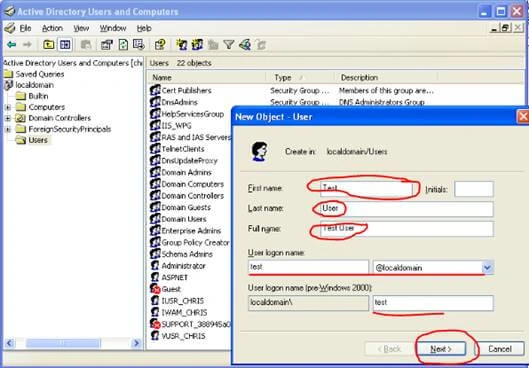
Fill in First name, Initials, last name, full name & user log on name. Click Next.
Step 5
Set the password and confirm password, type the user’s password and select appropriate password option. Click next and click finish.
So these are the steps to create a user in active directory.
Rajkiran SwainPosted Nov 16, 2017, 12:28 AM
Nice Sharing ..............