

Introduction
In this post, we will discuss output caching using Azure Redis Cache with Azure SQL database in Blazor projects. We will create an Indian Post Office application using which we can get the state-wise post office details.
Azure Redis Cache is based on the popular open source Redis Cache. Users get the best of both worlds, the rich Redis feature set and ecosystem, and reliable hosting and monitoring from Microsoft. It gives users access to a secure, dedicated Redis Cache, managed by Microsoft.
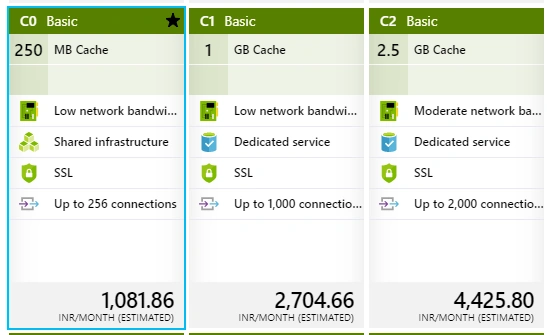
- Basic – Single node, multiple sizes, ideal for development/test and non-critical workloads. The basic tier has no SLA.
- Standard – A replicated cache in a two-node Primary/Secondary configuration managed by Microsoft, with a high availability SLA.
- Premium - The new Premium tier includes all the Standard-tier features and more, such as better performance compared to Basic or Standard-tier Caches, bigger workloads, data persistence, and enhanced network security.
Blazor framework
Blazor is still an experimental .NET web framework from Microsoft using C#/Razor and HTML that runs in the browser with Web Assembly. Blazor provides all the benefits of a client-side web UI framework using .NET on the client and optionally on the server.
- Single Page Application With Blazor And CosmosDB
- Blazor - CRUD Using PostgreSQL And Entity Framework Core
- Blazor - Connect With Amazon DynamoDB Using AWS SDK
- Blazor - Work With Cassandra API In Cosmos DB
- Localization In Blazor App Using Microsoft.JSInterop
- Blazor - Create SPA With Azure Database For MariaDB Server
- Blazor - Connect With Oracle Database In Amazon RDS
- Get C# Corner RSS Feeds In Blazor Project
- C# Corner RSS Feeds In Blazor With Pagination
- Deploy Blazor Application On AWS Cloud Using Elastic Beanstalk
Create Azure Redis Cache
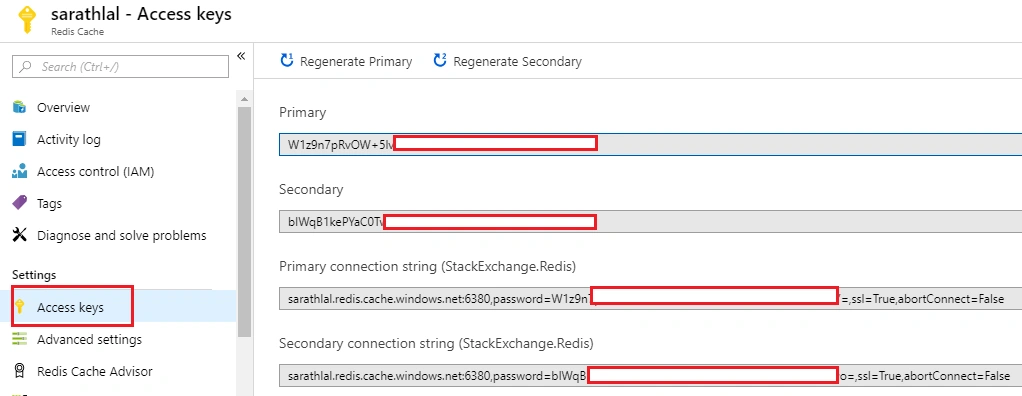
Login to Azure Portal
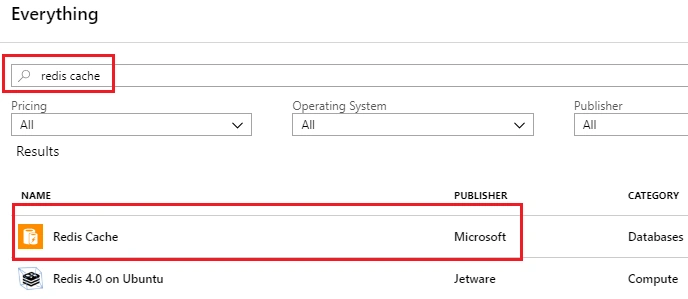
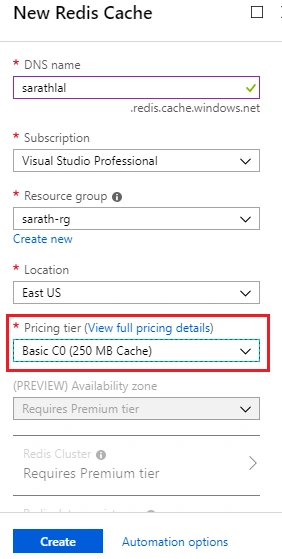
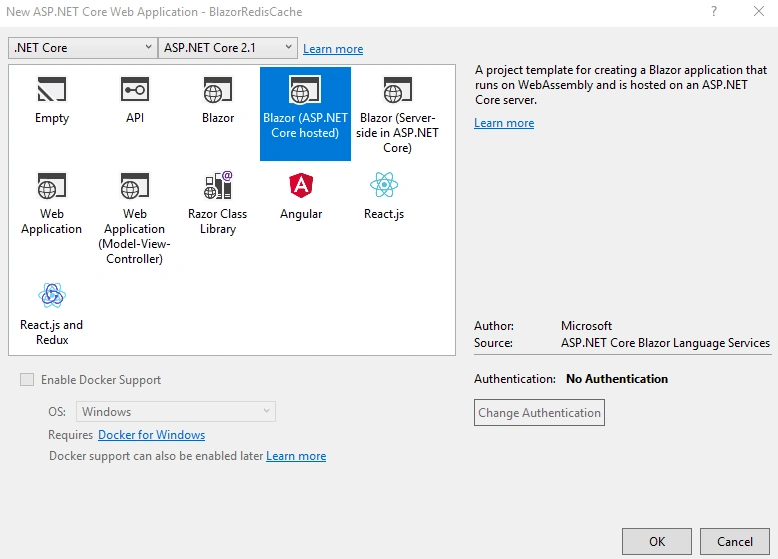
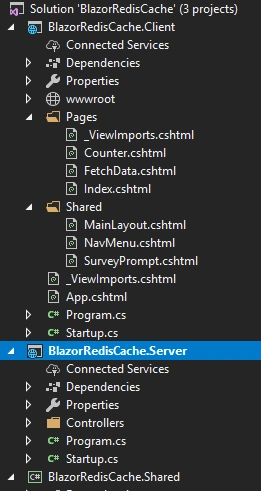
By default, Blazor created many files in these three projects. We can remove all the unwanted files like “Counter.cshtml”, “FetchData.cshtml”, “SurveyPrompt.cshtml” from Client project and “SampleDataController.cs” file from Server project and remove “WeatherForecast.cs” file from shared project too.

- using Newtonsoft.Json;
- using System.Collections.Generic;
- namespace BlazorRedisCache.Shared.Models
- {
- public class IndiaPO
- {
- [JsonProperty(PropertyName = "id")]
- public long Id { get; set; }
- [JsonProperty(PropertyName = "officeName")]
- public string OfficeName { get; set; }
- [JsonProperty(PropertyName = "pinCode")]
- public string PinCode { get; set; }
- [JsonProperty(PropertyName = "taluk")]
- public string Taluk { get; set; }
- [JsonProperty(PropertyName = "districtName")]
- public string DistrictName { get; set; }
- [JsonProperty(PropertyName = "stateName")]
- public string StateName { get; set; }
- [JsonProperty(PropertyName = "telephone")]
- public string Telephone { get; set; }
- }
- public class PODetails
- {
- public double TimeTaken { get; set; }
- public IEnumerable<IndiaPO> IndiaPOs { get; set; }
- public long RecordCount { get; set; }
- }
- public class State
- {
- [JsonProperty(PropertyName = "id")]
- public int Id { get; set; }
- [JsonProperty(PropertyName = "stateName")]
- public string StateName { get; set; }
- }
- }
We have created “IndiaPO”, “PODetails” and “State” classes inside this file.
The IndiaPO class will be used for getting post office details and PODetails class will hold the post office details along with the time taken (in seconds) to fetch the data information and total post office count. State class will be used to get the state names from SQL database.
- {
- "MyConfigurations": {
- "SqlConnection": "Server=tcp:sarathsqlserver.database.windows.net,1433;Initial Catalog=sarathsqldb;Persist Security Info=False;
- User ID=sarathlal;Password={Your Password};MultipleActiveResultSets=False;Encrypt=True;TrustServerCertificate=False;Connection Timeout=30;",
- "RedisKey": "sarathlal.redis.cache.windows.net:6380,password={Your Redis Key Password},ssl=True,abortConnect=False"
- }
- }
We must modify the “Starup.cs” class to read Configuration values from appsettings.json file.
- using BlazorRedisCache.Server.DataAccess;
- using Microsoft.AspNetCore.Blazor.Server;
- using Microsoft.AspNetCore.Builder;
- using Microsoft.AspNetCore.Hosting;
- using Microsoft.AspNetCore.ResponseCompression;
- using Microsoft.EntityFrameworkCore;
- using Microsoft.Extensions.Configuration;
- using Microsoft.Extensions.DependencyInjection;
- using Newtonsoft.Json.Serialization;
- using System.Linq;
- using System.Net.Mime;
- namespace BlazorRedisCache.Server
- {
- public class Startup
- {
- public Startup(IHostingEnvironment env)
- {
- var builder = new ConfigurationBuilder()
- .SetBasePath(env.ContentRootPath)
- .AddJsonFile("appsettings.json", optional: true, reloadOnChange: true);
- Configuration = builder.Build();
- }
- public IConfigurationRoot Configuration { get; set; }
- public void ConfigureServices(IServiceCollection services)
- {
- services.AddMvc();
- services.AddResponseCompression(options =>
- {
- options.MimeTypes = ResponseCompressionDefaults.MimeTypes.Concat(new[]
- {
- MediaTypeNames.Application.Octet,
- WasmMediaTypeNames.Application.Wasm,
- });
- });
- var sqlConnectionString = Configuration.GetSection("MyConfigurations").GetSection("SqlConnection").Value;
- services.AddDbContext<MsSqlServerContext>(options =>
- options.UseSqlServer(sqlConnectionString)
- );
- services.AddScoped<IDataAccessProvider, DataAccessProvider>();
- }
- public void Configure(IApplicationBuilder app, IHostingEnvironment env)
- {
- app.UseResponseCompression();
- if (env.IsDevelopment())
- {
- app.UseDeveloperExceptionPage();
- }
- app.UseMvc(routes =>
- {
- routes.MapRoute(name: "default", template: "{controller}/{action}/{id?}");
- });
- app.UseBlazor<Client.Program>();
- }
- }
- }
Please note, we have injected “MsSqlServerContext” class inside this class. This class file will be used for database connection using entity framework. Also note that we have injected “DataAccessProvider” class with “IDataAccessProvider” interface. These files will be used to perform CRUD actions in Web API controller. In this post, we will not cover all CRUD actions. We will use only READ method.
- using BlazorRedisCache.Shared.Models;
- using Microsoft.EntityFrameworkCore;
- namespace BlazorRedisCache.Server.DataAccess
- {
- public class MsSqlServerContext : DbContext
- {
- public MsSqlServerContext(DbContextOptions<MsSqlServerContext> options) : base(options)
- { }
- public DbSet<IndiaPO> IndiaPO { get; set; }
- public DbSet<State> POStates { get; set; }
- }
- }
We have added two DbSet properties inside this class. These properties will be used for getting data from SQL database.
- using BlazorRedisCache.Shared.Models;
- using System.Collections.Generic;
- namespace BlazorRedisCache.Server.DataAccess
- {
- public interface IDataAccessProvider
- {
- PODetails GetIndiaPOs(string stateName);
- IEnumerable<State> GetStateNames();
- }
- }
We can create “DataAccessProvider” class and implement above interface.
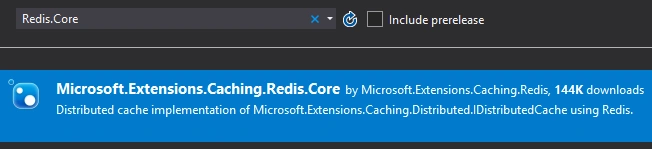
Add below code to “DataAccessProvider” class
- using BlazorRedisCache.Shared.Models;
- using Microsoft.Extensions.Configuration;
- using Newtonsoft.Json;
- using StackExchange.Redis;
- using System;
- using System.Collections.Generic;
- using System.Linq;
- using System.Threading.Tasks;
- namespace BlazorRedisCache.Server.DataAccess
- {
- public class DataAccessProvider : IDataAccessProvider
- {
- private readonly MsSqlServerContext _context;
- private IConfiguration _configuration;
- public DataAccessProvider(MsSqlServerContext context, IConfiguration Configuration)
- {
- _context = context;
- _configuration = Configuration;
- }
- public IEnumerable<State> GetStateNames()
- {
- return _context.POStates.OrderBy(o => o.StateName).ToList();
- }
- public PODetails GetIndiaPOs(string stateName)
- {
- var redisConnectionString = _configuration.GetSection("MyConfigurations").GetSection("RedisKey").Value;
- PODetails pODetails = new PODetails();
- var listPOs = new List<IndiaPO>();
- var redisConnect = ConnectionMultiplexer.Connect(redisConnectionString);
- IDatabase Rediscache = redisConnect.GetDatabase();
- var redisValue = Rediscache.StringGetAsync("stateDetails-" + stateName);
- if (string.IsNullOrEmpty(redisValue.Result))
- {
- listPOs = _context.IndiaPO.Where(w => w.StateName == stateName).ToList();
- Rediscache.StringSetAsync("stateDetails-" + stateName, JsonConvert.SerializeObject(listPOs), TimeSpan.FromMinutes(5));
- }
- else
- {
- listPOs = JsonConvert.DeserializeObject<List<IndiaPO>>(redisValue.Result);
- }
- pODetails.RecordCount = listPOs.Count();
- pODetails.IndiaPOs = listPOs.Take(100);
- return pODetails;
- }
- }
- }
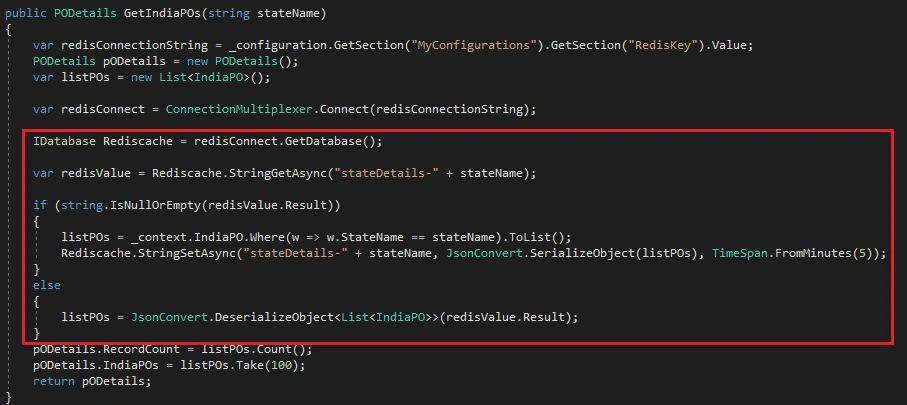
We have defined two methods in this class. “GetStateNames” method will be used to get state names from the database and return as a list.
In “GetIndiaPOs” method, we have established a connection to Azure Redis Cache using “ConnectionMultiplexer.Connect” method and read the value from Cache. As we know, the first time there will be no value available in the cache. So, it will return a null value and automatically get the value from database and store in a list variable. We also set the value to Redis Cache along with a key. Key will be “stateDetails-” + statename. We will store separate cache values for each state user selects. We have also set an expiry time of 5 minutes for each cache. After 5 minutes, the cache will be automatically expired.
Create “POsController” API controller and implement methods.
- using BlazorRedisCache.Server.DataAccess;
- using BlazorRedisCache.Shared.Models;
- using Microsoft.AspNetCore.Mvc;
- using System.Collections.Generic;
- using System.Diagnostics;
- namespace BlazorRedisCache.Server.Controllers
- {
- [Route("api/[controller]")]
- public class POsController : Controller
- {
- private readonly IDataAccessProvider _dataAccessProvider;
- public POsController(IDataAccessProvider dataAccessProvider)
- {
- _dataAccessProvider = dataAccessProvider;
- }
- [HttpGet]
- public IEnumerable<State> GetStates()
- {
- return _dataAccessProvider.GetStateNames();
- }
- [HttpGet("{stateName}")]
- public PODetails Get(string stateName)
- {
- Stopwatch clock = Stopwatch.StartNew();
- var data = _dataAccessProvider.GetIndiaPOs(stateName);
- clock.Stop();
- data.TimeTaken = clock.Elapsed.TotalSeconds;
- return data;
- }
- }
- }
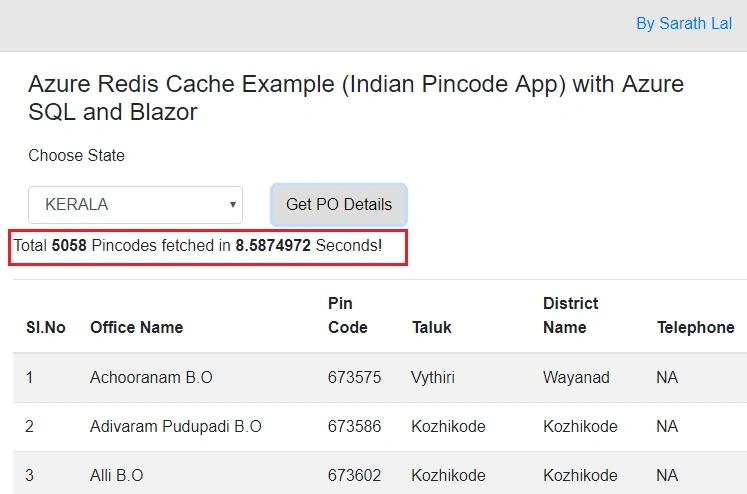
We have implemented the methods for getting State names and Post office details. Please note, I have added a stopwatch to calculate the time between request start and end so that we can find the time difference between SQL server request and Cache.
- @using BlazorRedisCache.Shared.Models
- @page "/getpos"
- @inject HttpClient Http
- <h4>Azure Redis Cache Example (Indian Pincode App) with Azure SQL and Blazor</h4>
- <div class="row" style="padding-top:10px">
- <div class="col-md-4">
- <label for="Choose State" class="control-label">Choose State</label>
- </div>
- </div>
- <div class="row" style="padding-top:10px">
- <div class="col-md-4">
- <select class="form-control" onchange="@StateChanged">
- <option value="select">--Select a State--</option>
- @foreach (var state in states)
- {
- <option value="@state.StateName">@state.StateName</option>
- }
- </select>
- </div>
- <div class="col-md-4">
- <input type="button" class="btn btn-default" onclick="@(async () => await GetPO())" value="Get PO Details" />
- </div>
- </div>
- @if (states == null || states.Count == 0)
- {
- <p><em>Loading...</em></p>
- }
- else
- {
- if (buttonSelected)
- {
- <p><em>Loading...</em></p>
- }
- if (pODetails != null)
- {
- <div class="row" style="padding-top:10px">
- <p>Total <b>@pODetails.RecordCount</b> Pincodes fetched in <b>@pODetails.TimeTaken</b> Seconds!</p>
- </div>
- counter = 0;
- <div class="row" style="padding-top:5px">
- <table class="table table-striped">
- <thead>
- <tr>
- <th>Sl.No</th>
- <th>Office Name</th>
- <th>Pin Code</th>
- <th>Taluk</th>
- <th>District Name</th>
- <th>Telephone</th>
- </tr>
- </thead>
- <tbody>
- @foreach (var po in pODetails.IndiaPOs)
- {
- counter++;
- <tr>
- <td>@counter</td>
- <td>@po.OfficeName</td>
- <td>@po.PinCode</td>
- <td>@po.Taluk</td>
- <td>@po.DistrictName</td>
- <td>@po.Telephone</td>
- </tr>
- }
- </tbody>
- </table>
- </div>
- if (pODetails.RecordCount > 100)
- {
- <div class="row" style="padding-top:5px">
- <p>We are listing 100 rows only!</p>
- </div>
- }
- }
- }
- @functions{
- List<State> states = new List<State>();
- string stateName;
- PODetails pODetails;
- int counter;
- bool buttonSelected;
- protected override async Task OnInitAsync()
- {
- buttonSelected = false;
- states = await Http.GetJsonAsync<List<State>>("api/pos");
- }
- protected async Task GetPO()
- {
- pODetails = null;
- buttonSelected = true;
- pODetails = await Http.GetJsonAsync<PODetails>("api/pos/" + stateName);
- buttonSelected = false;
- }
- void StateChanged(UIChangeEventArgs stateEvent)
- {
- stateName = stateEvent.Value.ToString();
- }
- }
We have called the API method for getting state names in “OnInitAsync” event and we have added a new method to call API method for getting post office details.
- <div class="top-row pl-4 navbar navbar-dark">
- <a class="navbar-brand" href="">Azure Redis Cache in Blazor</a>
- <button class="navbar-toggler" onclick=@ToggleNavMenu>
- <span class="navbar-toggler-icon"></span>
- </button>
- </div>
- <div class=@(collapseNavMenu ? "collapse" : null) onclick=@ToggleNavMenu>
- <ul class="nav flex-column">
- <li class="nav-item px-3">
- <NavLink class="nav-link" href="" Match=NavLinkMatch.All>
- <span class="oi oi-home" aria-hidden="true"></span> Home
- </NavLink>
- </li>
- <li class="nav-item px-3">
- <NavLink class="nav-link" href="/getpos">
- <span class="oi oi-list-rich" aria-hidden="true"></span> Get Pincode Details
- </NavLink>
- </li>
- </ul>
- </div>
- @functions {
- bool collapseNavMenu = true;
- void ToggleNavMenu()
- {
- collapseNavMenu = !collapseNavMenu;
- }
- }
Modify the “Index.cshtml” file in “Pages” folder too.
- @page "/"
- <h3>Azure Redis Cache with Azure SQL and Blazor</h3>
- <hr />
- <p>
- We will see the caching with Azure Redis Cache and Azure SQL database in Blazor project
- </p>
We have completed all the coding part. We can run the application now.
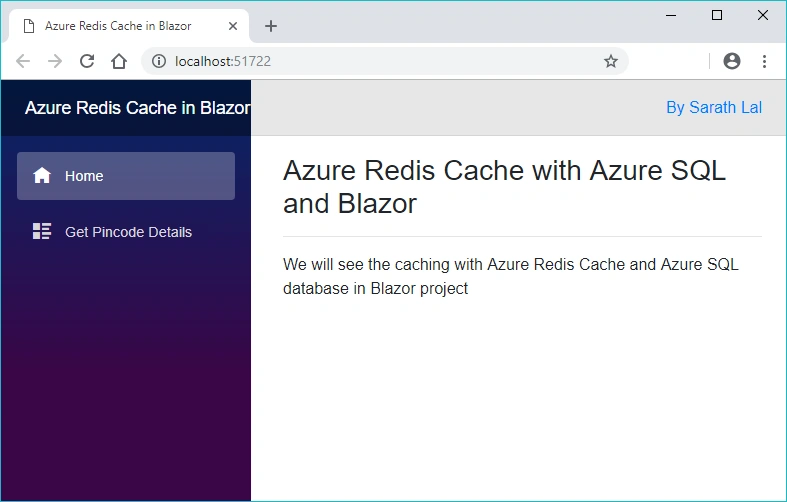
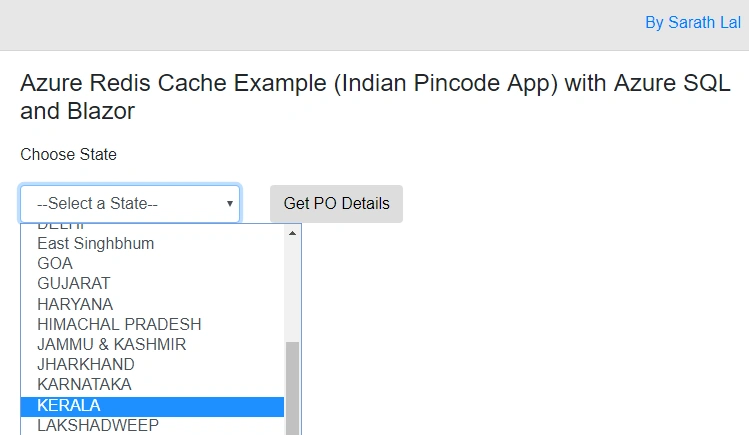
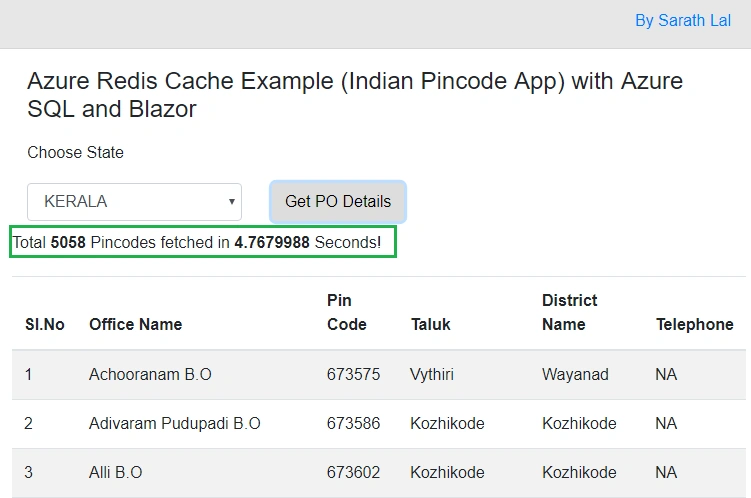
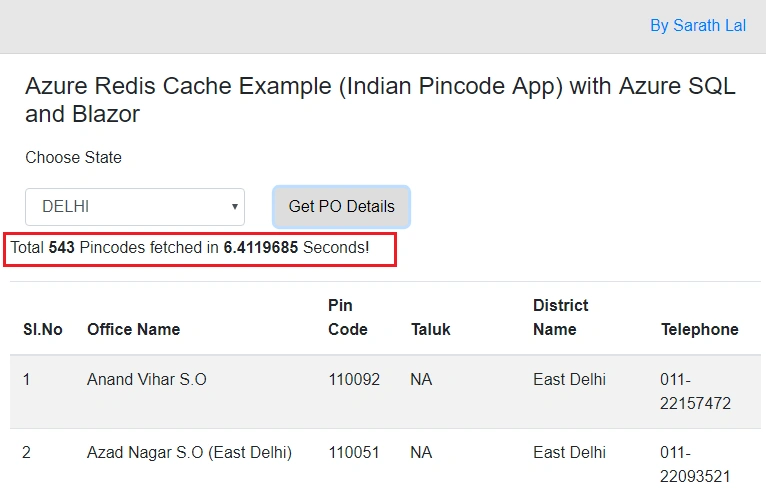
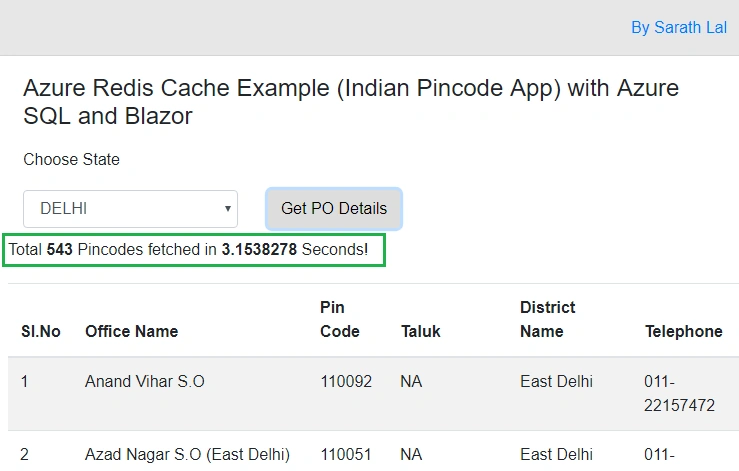
Click the “Get Pincode Details” link. It will display all the state names. You can select any state and click “Get PO Details”. I have chosen “KERALA” as the state.
Sundaram SubramanianPosted Dec 31, 2018, 10:52 AM
I wonder where you get these kinds of ideas to explore. Keep it up and share with us like this. We are happy to learn new skills.
Jithin JohnPosted Dec 13, 2018, 4:01 AM
Really help full. Great article.