

By this time, you must have had a chance to read the articles, mentioned below.
- Azure Redis Cache – Introduction
- Azure Redis Cache Configure Data Persistence
- Azure Redis Cache Enhanced Security And Network Isolation
Azure provides the three tiers, mentioned below, for Azure Redis Cache.
- Basic
- Standard
- Premium
Premium tier provides multiple additional features. In this article, we will learn how to improve the performance of the Azure Redis Cache endpoint by configuring the clustering to the Azure Redis Cache Service.
Introduction
When you create an Azure Redis Cache, Azure provides you a node that serves the requests with a limited number of requests per second. Sometimes, the performance levels of the default configuring might not be sufficient. Thus, you would need to scale out Azure Redis Cache. We can enable the scaling and high availability of Azure Redis Cache by configuring Clusters. Let’s see how to enable Clusters for Azure Redis Cache.
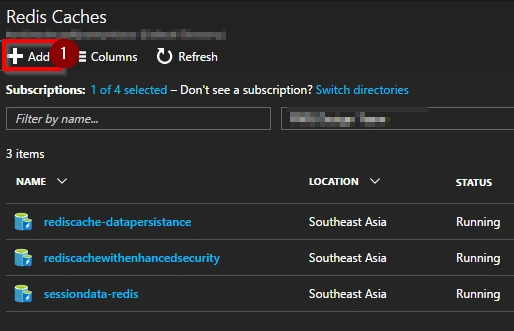
Navigate to the Azure Management portal and go to Azure Redis Cache. Click Add, as shown below.
You will be taken to the New Redis Cache blade, as shown below. You must choose one of the available Premium Tiers. In this example, I have selected P1 Premium tier. Once you select the required tier, click Select.
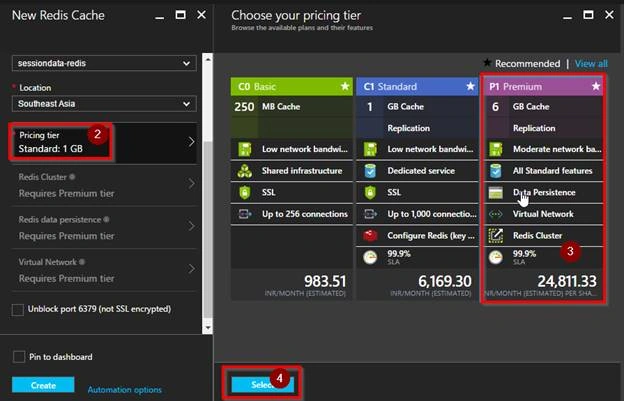
You must choose one of the available Premium tiers. In this example, I have selected P1 Premium tier. Once you select the required tier, click Select.
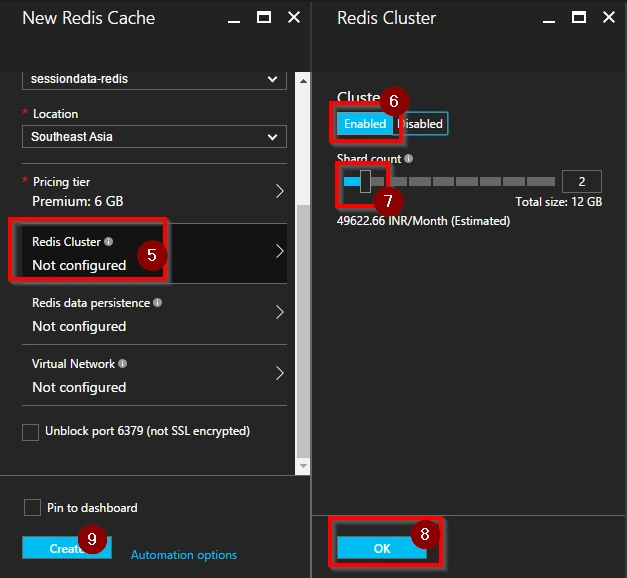
Clicking on the Redis Cluster in the New Redis Cache blade, you will be taken to the Redis Cluster blade, as shown above, where you can choose the number of shards.
By default, Azure Redis Cache would be provisioned with 1 shard. You can choose up to 10 shards.
For this example, In the screenshot given above, my selected tier is Premium tier 6 GB; when I choose 2 shards, I get 12 GB of storage for storing the data.
For Premium P1 tier, the maximum size of the cache is 60 GB (10 Shards * 6 GB per shard). However, if you think 60 GB is not sufficient, then you have to choose higher Premium tier depending on your requirements. The maximum size that you would get is 530 GB in Premium P4 tier.
Also note that each shard is a set of two instances: the primary / replica pair. We will discuss more about shard and its features at the end of the article.
Once you choose the required number of shards, click OK in Redis Cluster blade and then click Create button in the New Redis Cache blade.
As shown below, we have successfully created Azure Redis Cache.
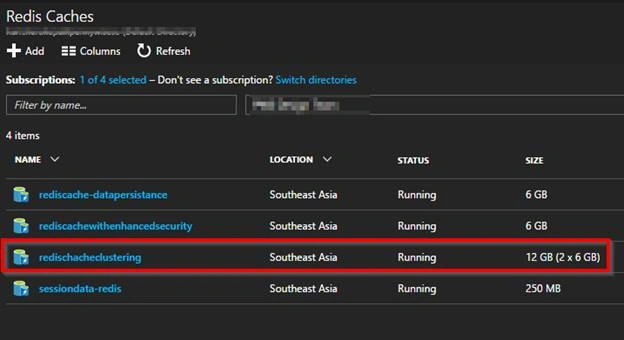
In case you would like to increase the memory size after you created the Azure Redis Cache, you can do that by using one of the preview features named Redis Cluster Size, as shown below.
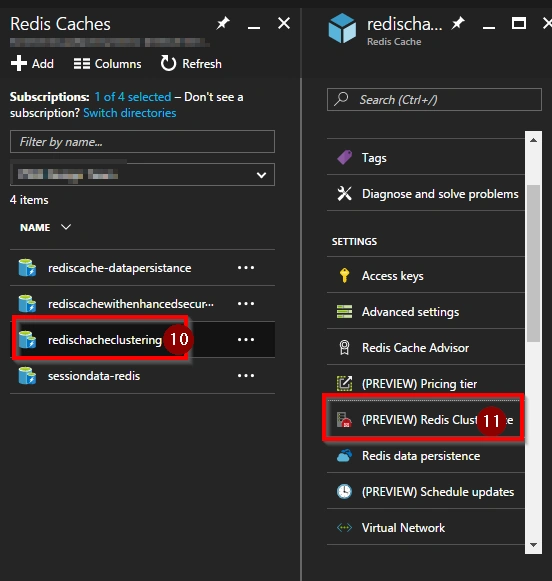
By clicking on Redis Cluster Size blade, you will be taken, as shown below.
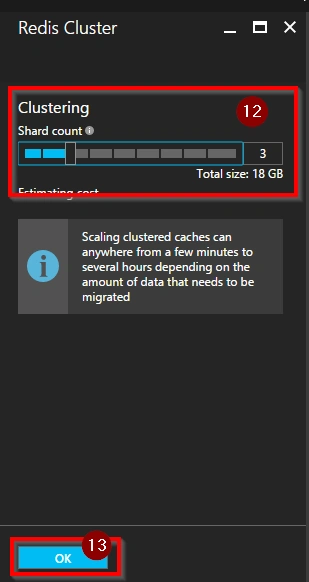
As shown above, increase the Shard count based on your requirement and click OK to update the cluster size.
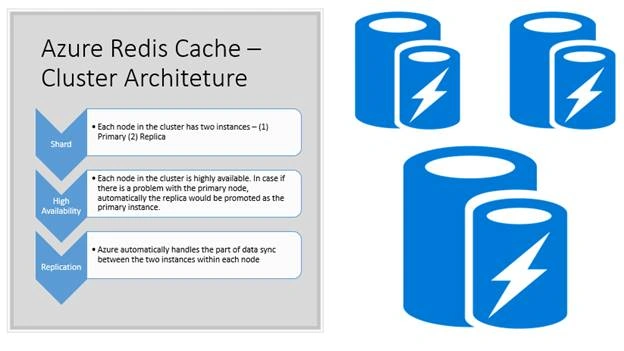
Azure Redis Cache – Cluster Architecture
Below are the details about the diagram shown above.
- The diagram shown above is a cluster with Shard count 3, which we have configured for our Azure Redis Cache in this example.
- Each node in the cluster has two instances
- First one is the primary instance – This is the one that is used for serving the requests.
- Second one is the replica of the primary instance. – In case the Primary instance is not healthy, the second one – replica -- will be used automatically.
- Each node in the cluster is highly available. If there is a problem with the primary node, the replica will be promoted as the primary instance automatically.
- Azure automatically handles the part of the data synchronization between the two instances within each node.
Summary
In this article, we learned the things to follow:
- Configure Clusters for Azure Redis Cache while creating a new Azure Redis Cache
- Increase the cluster size to an existing Azure Redis Cache.
- Azure Redis Cluster Architecture
I hope you enjoyed reading the article. Your feedback is appreciated. You can read the original article here.
Join the conversation! Your thoughts help the community grow.