

Introduction
In this article, I'll show you how to create an automatic plant watering system using Arduino Mega interfacing with Android mobile. This project is fully based on soil moisture irrigation.
Requirements
- Arduino Mega
- Soil Moisture Sensor
- Motor
- HC-05 Bluetooth Module
- Bread Board
- GSM900 Module
- Led
- Some Wires
Connections
GSM
- RX to RX1
- TX to TX 1
- Gnd to Gnd
Bluetooth
- RX to TX
- TX to RX
- Vcc to Arduino 5v
- Gnd to Gnd
Led
- Anode to the digital pin 5
- Cathode pin to the Gnd
Soil Moisture
- Vcc pin to the 5v
- Gnd to Gnd
- Data pin to the Analog A0
Programming
- #include<SoftwareSerial.h>
- SoftwareSerial firstSerial(15,16);
- int led = 5;
- int pin=A0;
- int moisture=0;
- String readString;
- void setup()
- {
- Serial.begin(9600);
- firstSerial.begin(9600);
- Serial.begin(9600);
- pinMode(led, OUTPUT);
- delay(100); // Baud Rate
- }
- void loop()
- {
- while (Serial.available()) //Send data only when you receive data
- {
- delay(4); //delay time
- char c = Serial.read();
- readString += c;
- }
- if (readString.length() > 0)
- {
- Serial.println(readString);
- if (readString == "ON")
- {
- digitalWrite(led, HIGH); // LED ON
- }
- if (readString == "OFF")
- {
- digitalWrite(led, LOW); //LED OFF
- }
- readString = "";
- }
- int soilmoisture=analogRead(pin);
- if(soilmoisture>=100){
- digitalWrite(led,HIGH);
- firstSerial.println("AT+CMGF=1");
- delay(1000);
- firstSerial.println("AT+CMGS=\"+xxxxxxxxxx\"\r"); //Enter Your Mobile Number instead XXXX while Testing
- delay(1000);
- firstSerial.println("Hai there I need some water");
- delay(100);
- firstSerial.println((char)23);
- delay(1000);
- }
- else{
- digitalWrite(led,LOW);
- }
- Serial.println(soilmoisture);
- Serial.print("%");
- delay(20);
- }
Android App
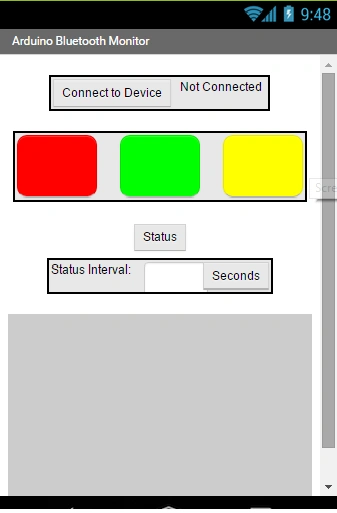
- The Android App is developed using MIT App inventor.
- The Android coding is attached in the zip you can download and install it to your mobile and you can modify it with your own method.
Explanation
The Automatic plant watering system is based upon soil irrigation. In the program first, we want to set the header file to the GSM Module and set the RX and TX Pin to the GSM Module. In the setup function, we want to set the baud rate for GSM and the Arduino Board as 9600 and here we are using the HC-05 Bluetooth device for pairing between Android mobile and the Arduino when it is paired, which means completely controlled through the Android device. Here's the procedure:
Working Procedure
- Step 1: Connect the device using the BT Communication method and pair it to Android Mobile.
- Step 2: It shows the status every 60 seconds.
- Step 3: When the temperature is greater than 100 the water will pump through the plant. This is based on soil irrigation.
Output

Read more articles on Arduino:
Vimal VijasangarPosted Sep 13, 2018, 1:09 PM
How do we add relay to the circuit
Delpin Susai RajPosted Aug 28, 2016, 4:37 AM
Nice
Prasanna MuraliPosted Jun 22, 2016, 9:24 PM
Nice one..
Sibeesh VenuPosted Feb 18, 2016, 12:10 AM
Nice Share
Raja TPosted Feb 16, 2016, 11:06 PM
Nice, Thanks for sharing
Santhakumar MunuswamyPosted Feb 16, 2016, 2:49 PM
Thanks for nice article
Hemant SrivastavaPosted Feb 16, 2016, 9:25 AM
Interesting
Jithil JohnPosted Feb 16, 2016, 2:07 AM
What about the cost?
Jithil JohnPosted Feb 16, 2016, 2:06 AM
Good one
Md Almajid KoushikPosted Feb 16, 2016, 1:22 AM
Nice article, thanks for share!!!!!
Shubham KumarPosted Feb 16, 2016, 12:13 AM
Interesting +1 keep share
Ravi PatelPosted Feb 16, 2016, 12:12 AM
interesting article thanks
Shridhar SharmaPosted Feb 16, 2016, 12:09 AM
good one
Jithil JohnPosted Feb 15, 2016, 10:54 PM
Good one
Kumaresh RajalingamPosted Feb 15, 2016, 8:28 PM
Thanks SR
Sr KarthigaPosted Feb 15, 2016, 7:40 PM
Good one sir