

Introduction
This article walks you through the steps to create a Web Application, using AngularJS, which uses WebAPI to communicate between client and Server side.
Step 1
Check the link given below to see all the steps to create a Web API wtih an Entity Framework code first implementation.
http://social.technet.microsoft.com/wiki/contents/articles/26795.asp-net-webapi-entity-framework-code-first.aspx
Step 2
Now, in order to use an Entity Framework, we need to install a NuGet package.
In Visual Studio 2013, select the menu option given below.
Tools-> Library Package manager -> Manage NuGet Packages for the solution.
Search for AngularJS and select the option Install.
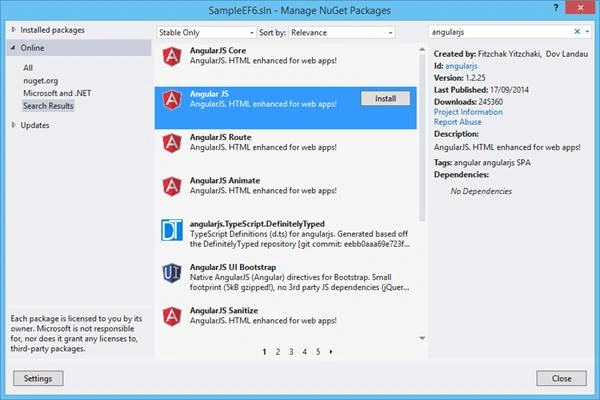
This option will automatically install the NuGet package.
Step 3
Now, add a new JavaScript file (contactController.js) in scripts directory and add Angular functions.
JavaScript
- function contactController($scope, $http) {
- $scope.loading = true;
- $scope.addMode = false;
- //Used to display the data
- $http.get('/api/Contact/').success(function (data) {
- $scope.Contacts = data;
- $scope.loading = false;
- })
- .error(function () {
- $scope.error = "An Error has occured while loading posts!";
- $scope.loading = false;
- });
- $scope.toggleEdit = function () {
- this.Contact.editMode = !this.Contact.editMode;
- };
- $scope.toggleAdd = function () {
- $scope.addMode = !$scope.addMode;
- };
- //Used to save a record after edit
- $scope.save = function () {
- alert("Edit");
- $scope.loading = true;
- var frien = this.Contact;
- alert(emp);
- $http.put('/api/Contact/', frien).success(function (data) {
- alert("Saved Successfully!!");
- emp.editMode = false;
- $scope.loading = false;
- }).error(function (data) {
- $scope.error = "An Error has occured while Saving Contact! " + data;
- $scope.loading = false;
- });
- };
- //Used to add a new record
- $scope.add = function () {
- $scope.loading = true;
- $http.post('/api/Contact/', this.newContact).success(function (data) {
- alert("Added Successfully!!");
- $scope.addMode = false;
- $scope.Contacts.push(data);
- $scope.loading = false;
- }).error(function (data) {
- $scope.error = "An Error has occured while Adding Contact! " + data;
- $scope.loading = false;
- });
- };
- //Used to edit a record
- $scope.deleteContact = function () {
- $scope.loading = true;
- var Contactid = this.Contact.ContactId;
- $http.delete('/api/Contact/' + Contactid).success(function (data) {
- alert("Deleted Successfully!!");
- $.each($scope.Contacts, function (i) {
- if ($scope.Contacts[i].ContactId === Contactid) {
- $scope.Contacts.splice(i, 1);
- return false;
- }
- });
- $scope.loading = false;
- }).error(function (data) {
- $scope.error = "An Error has occured while Saving Contact! " + data;
- $scope.loading = false;
- });
- };
- }
Step 4
On BundlesConfig file, add the lines of code given below.
C#
- bundles.Add(new ScriptBundle("~/bundles/angularjs").Include(
- "~/Scripts/angular.js",
- "~/Scripts/contactController.js"));
Open _Layout.cshtml page from shared folder and add these two lines to render AngularJS and contactController in an Application.
JavaScript
- @Scripts.Render("~/bundles/angularjs")
Now, let’s work on View.
HTML
- @{
- Layout = "~/Views/Shared/_Layout.cshtml";
- }
- <h2>Contacts</h2>
- <div ng-app="" ng-controller="contactController" class="container">
- <strong class="error">{{ error }}</strong>
- <div class="row">
- <div class="logs-table col-xs-12">
- <table class="table table-bordered table-hover" style="width:100%">
- <tr>
- <th>Id</th>
- <th>Name</th>
- <th>Address</th>
- <th>City</th>
- <th>Country</th>
- </tr>
- <tr ng-repeat="contact in contacts">
- <td>{{ contact.Id }}</td>
- <td>{{ contact.Name }}</td>
- <td>{{ contact.Address }}</td>
- <td>{{ contact.City }}</td>
- <td>{{ contact.Country }}</td>
- </tr>
- </table>
- </div>
- </div>
- </div>
Step 5
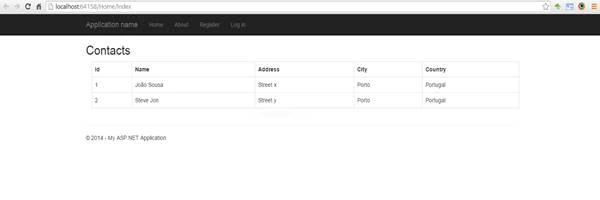
Run the Application to see the output.
Resources
Some good resources about Windows Azure can be found at
- My personal blog: http://joaoeduardosousa.wordpress.com/
- Angular UI:http://angular-ui.github.io/
Thiruppathi RPosted May 12, 2017, 7:53 AM
Nice Article.Thanks to sharing..
Rajesh KadamPosted May 9, 2017, 1:16 AM
Good article. but, you forgot to add code for add, edit and delete.
Manav PandyaPosted May 9, 2017, 12:30 AM
Nice share .........................
Rafnas T PPosted May 9, 2017, 12:26 AM
Nice share. keep sharing..