

Introduction
In this article, we are going to create a web application using ASP.NET Core 2.0 and Angular 5 with the help of Entity Framework Core database first approach. We will be creating a sample Employee Record Management system. To read the inputs from the user, we are using Angular Forms with required field validations on the client side. We are also going to bind a dropdown list in the Angular Form to a table in the database using EF Core. We will also learn how to deploy this application on IIS.
We will be using Visual Studio 2017 and SQL Server 2012.
Prerequisites
- Install .NET Core 2.0.0 or above SDK from here.
- Install the latest version of Visual Studio 2017 Community Edition from here.
- Download and install the latest version of Node.js from here..
- SQL Server 2008 or above.
Source Code
Before proceeding I would recommend you to get the source code from Github.
Creating Table
- tblEmployee: - Used to store the details of employee. It contains fields such as EmployeeID, Name, City, Department, and Gender.
- tblCities: - This contains the list of cities and used to populate the City field of tblEmployee table. It contains two fields CityID and CityName.
Execute the following commands to create both tables
- CREATE TABLE tblEmployee (
- EmployeeID int IDENTITY(1,1) NOT NULL PRIMARY KEY,
- Name varchar(20) NOT NULL ,
- City varchar(20) NOT NULL ,
- Department varchar(20) NOT NULL ,
- Gender varchar(6) NOT NULL
- )
- GO
- CREATE TABLE tblCities (
- CityID int IDENTITY(1,1) NOT NULL PRIMARY KEY,
- CityName varchar(20) NOT NULL
- )
- GO
- INSERT INTO tblCities VALUES('New Delhi');
- INSERT INTO tblCities VALUES('Mumbai');
- INSERT INTO tblCities VALUES('Hyderabad');
- INSERT INTO tblCities VALUES('Chennai');
- INSERT INTO tblCities VALUES('Bengaluru');
Now, our Database part has been completed. So, we will proceed to create the MVC application using Visual Studio 2017.
Create MVC Web Application
After selecting the project, a "New Project" dialog will open. Select .NET Core inside Visual C# menu from the left panel.
Then, select “ASP.NET Core Web Application” from available project types. Put the name of the project as EFNgApp and press OK.
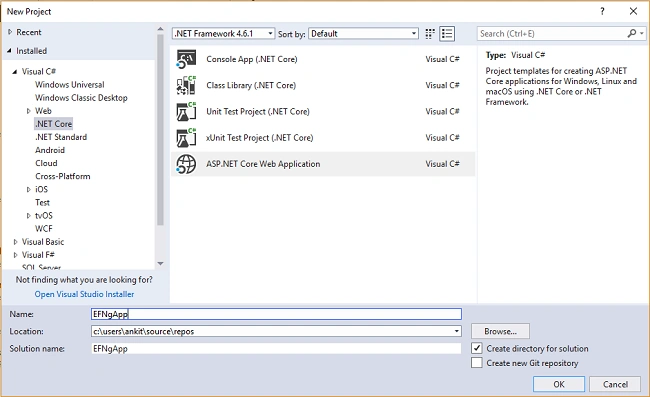
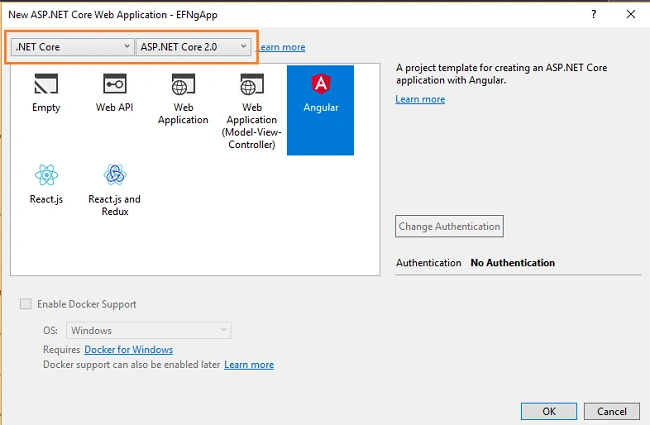
After clicking on OK, a new dialog will open asking you to select the project template. You can observe two drop-down menus at the top left of the template window. Select “.NET Core” and “ASP.NET Core 2.0” from these dropdowns. Then, select “Angular” template and press OK.
Now, our project will be created. You can observe the folder structure in Solution Explorer as shown in the below image.
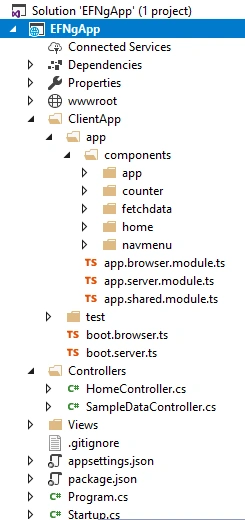
Here, we have our Controllers and Views folders. We won’t be touching the Views folders for this tutorial since we will be using Angular to handle the UI. The Controllers folders will contain our Web API controller. The point of interest for us is the ClientApp folder where the client side of our application resides. Inside the ClientApp/app/components folder, we already have few components created which are provided by default with the Angular template in VS 2017. These components won’t affect our application, but for the sake of this tutorial, we will delete fetchdata and counter folders from ClientApp/app/components.
Adding the Model to the Application
We are using Entity Framework core database first approach to create our models. Navigate to Tools >> NuGet Package Manager >> Package Manager Console.
- Install-Package Microsoft.EntityFrameworkCore.SqlServer
Since we are using Entity Framework Tools to create a model from the existing database, we will install the tools package as well. Hence run the following command:
- Install-Package Microsoft.EntityFrameworkCore.Tools
- Scaffold-DbContext "Your connection string here" Microsoft.EntityFrameworkCore.SqlServer -OutputDir Models -Tables tblEmployee, tblCities
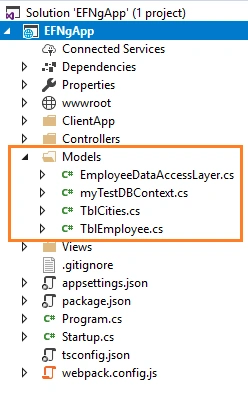
Do not forget to put your own connection string (inside " "). After this command gets executed successfully you can observe a Models folder has been created and it contains three class files myTestDBContext.cs, TblCities.cs and TblEmployee.cs. And hence we have successfully created our Models using EF core database first approach.
Now, we will create one more class file to handle database related operations
Right click on Models folder and select Add >> Class. Name your class EmployeeDataAccessLayer.cs and click Add button. At this point of time, the Models folder will have the following structure.
- using Microsoft.EntityFrameworkCore;
- using System;
- using System.Collections.Generic;
- using System.Linq;
- using System.Threading.Tasks;
- namespace EFNgApp.Models
- {
- public class EmployeeDataAccessLayer
- {
- myTestDBContext db = new myTestDBContext();
- public IEnumerable<TblEmployee> GetAllEmployees()
- {
- try
- {
- return db.TblEmployee.ToList();
- }
- catch
- {
- throw;
- }
- }
- //To Add new employee record
- public int AddEmployee(TblEmployee employee)
- {
- try
- {
- db.TblEmployee.Add(employee);
- db.SaveChanges();
- return 1;
- }
- catch
- {
- throw;
- }
- }
- //To Update the records of a particluar employee
- public int UpdateEmployee(TblEmployee employee)
- {
- try
- {
- db.Entry(employee).State = EntityState.Modified;
- db.SaveChanges();
- return 1;
- }
- catch
- {
- throw;
- }
- }
- //Get the details of a particular employee
- public TblEmployee GetEmployeeData(int id)
- {
- try
- {
- TblEmployee employee = db.TblEmployee.Find(id);
- return employee;
- }
- catch
- {
- throw;
- }
- }
- //To Delete the record of a particular employee
- public int DeleteEmployee(int id)
- {
- try
- {
- TblEmployee emp = db.TblEmployee.Find(id);
- db.TblEmployee.Remove(emp);
- db.SaveChanges();
- return 1;
- }
- catch
- {
- throw;
- }
- }
- //To Get the list of Cities
- public List<TblCities> GetCities()
- {
- List<TblCities> lstCity = new List<TblCities>();
- lstCity = (from CityList in db.TblCities select CityList).ToList();
- return lstCity;
- }
- }
- }
Now, we will proceed to create our Web API Controller.
Right click on Controllers folder and select Add >> New Item.
An “Add New Item” dialog box will open. Select ASP.NET from the left panel, then select “Web API Controller Class” from templates panel and put the name as EmployeeController.cs. Press OK.
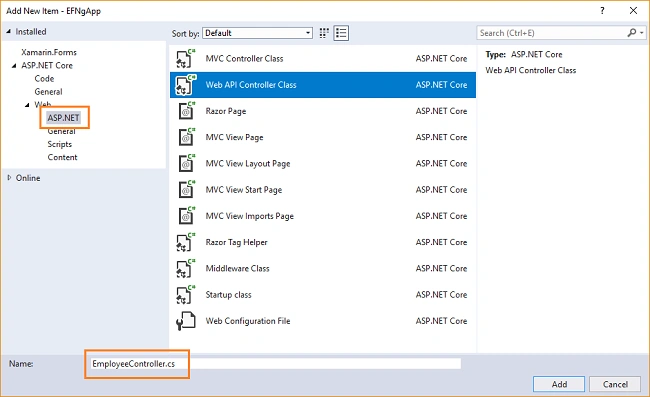
This will create our Web API EmployeeController class. We will put all our business logic in this controller. We will call the methods of EmployeeDataAccessLayer to fetch data and pass on the data to the Angular frontend.
Open EmployeeController.cs file and put the following code into it.- using System;
- using System.Collections.Generic;
- using System.Linq;
- using System.Threading.Tasks;
- using EFNgApp.Models;
- using Microsoft.AspNetCore.Mvc;
- namespace EFNgApp.Controllers
- {
- public class EmployeeController : Controller
- {
- EmployeeDataAccessLayer objemployee = new EmployeeDataAccessLayer();
- [HttpGet]
- [Route("api/Employee/Index")]
- public IEnumerable<TblEmployee> Index()
- {
- return objemployee.GetAllEmployees();
- }
- [HttpPost]
- [Route("api/Employee/Create")]
- public int Create([FromBody] TblEmployee employee)
- {
- return objemployee.AddEmployee(employee);
- }
- [HttpGet]
- [Route("api/Employee/Details/{id}")]
- public TblEmployee Details(int id)
- {
- return objemployee.GetEmployeeData(id);
- }
- [HttpPut]
- [Route("api/Employee/Edit")]
- public int Edit([FromBody]TblEmployee employee)
- {
- return objemployee.UpdateEmployee(employee);
- }
- [HttpDelete]
- [Route("api/Employee/Delete/{id}")]
- public int Delete(int id)
- {
- return objemployee.DeleteEmployee(id);
- }
- [HttpGet]
- [Route("api/Employee/GetCityList")]
- public IEnumerable<TblCities> Details()
- {
- return objemployee.GetCities();
- }
- }
- }
We are done with our backend logic. So, we will now proceed to code our frontend using Angular 5.
Create the Angular Service
Right click on Sevices folder and select Add >> New Item. An “Add New Item” dialog box will open. Select Scripts from the left panel, then select “TypeScript File” from templates panel, and put the name as empservice.service.ts. Press OK
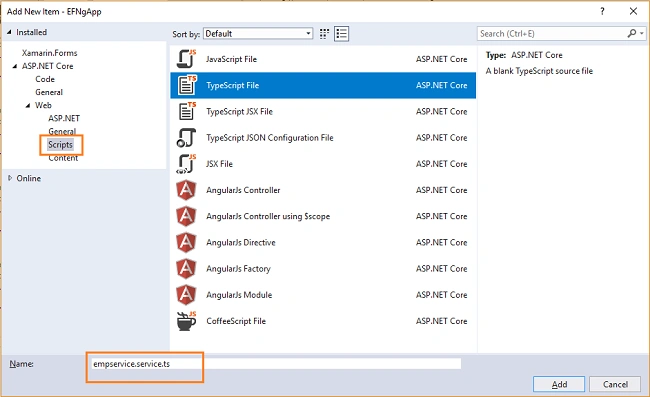
Open empservice.service.ts file and put the following code into it.
- import { Injectable, Inject } from '@angular/core';
- import { Http, Response } from '@angular/http';
- import { Observable } from 'rxjs/Observable';
- import { Router } from '@angular/router';
- import 'rxjs/add/operator/map';
- import 'rxjs/add/operator/catch';
- import 'rxjs/add/observable/throw';
- @Injectable()
- export class EmployeeService {
- myAppUrl: string = "";
- constructor(private _http: Http, @Inject('BASE_URL') baseUrl: string) {
- this.myAppUrl = baseUrl;
- }
- getCityList() {
- return this._http.get(this.myAppUrl + 'api/Employee/GetCityList')
- .map(res => res.json())
- .catch(this.errorHandler);
- }
- getEmployees() {
- return this._http.get(this.myAppUrl + 'api/Employee/Index')
- .map((response: Response) => response.json())
- .catch(this.errorHandler);
- }
- getEmployeeById(id: number) {
- return this._http.get(this.myAppUrl + "api/Employee/Details/" + id)
- .map((response: Response) => response.json())
- .catch(this.errorHandler)
- }
- saveEmployee(employee) {
- return this._http.post(this.myAppUrl + 'api/Employee/Create', employee)
- .map((response: Response) => response.json())
- .catch(this.errorHandler)
- }
- updateEmployee(employee) {
- return this._http.put(this.myAppUrl + 'api/Employee/Edit', employee)
- .map((response: Response) => response.json())
- .catch(this.errorHandler);
- }
- deleteEmployee(id) {
- return this._http.delete(this.myAppUrl + "api/Employee/Delete/" + id)
- .map((response: Response) => response.json())
- .catch(this.errorHandler);
- }
- errorHandler(error: Response) {
- console.log(error);
- return Observable.throw(error);
- }
- }
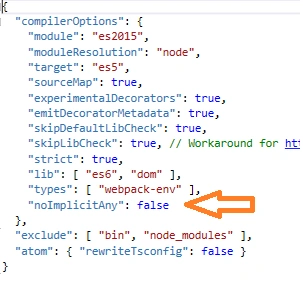
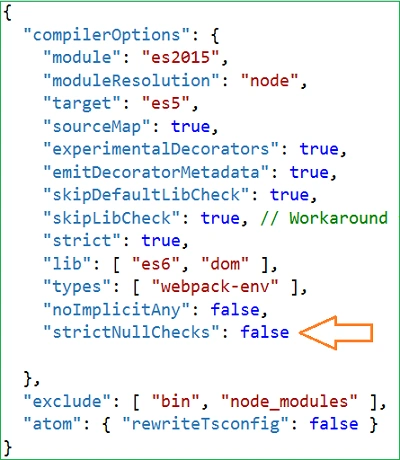
At this point of time, you might get an error “Parameter 'employee' implicitly has an 'any' type” in empservice.service.ts file.
If you encounter this issue, then add the following line inside tsconfig.json file.
"noImplicitAny": false
Creating Angular Components
We will be adding two Angular components to our application –
- fetchemployee component - to display all the employee data and delete an existing employee data.
- addemployee component - to add a new employee data or edit an existing employee data.
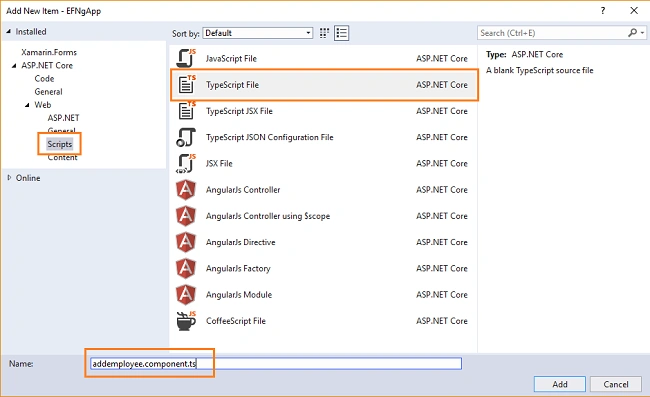
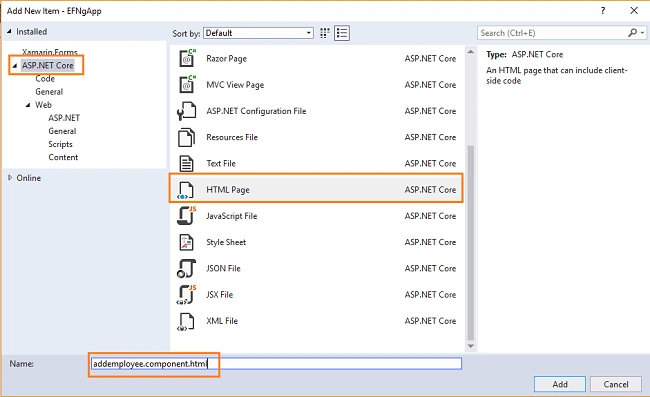
Right click on addemployee folder and select Add >> New Item. An “Add New Item” dialog box will open. Select ASP.NET Core from the left panel, then select “HTML Page” from templates panel, and put the name as addemployee.component.html. Press OK. This will add a HTML file inside addemployee folder.
Similarly create a fetchemployee folder inside ClientApp/app/components folder and add fetchemployee.component.ts typescript and fetchemployee.component.html HTML file to it.
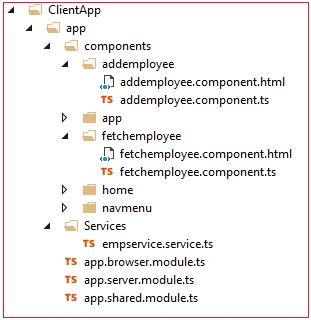
Open fetchemployee.component.ts file and put the following code to it:
- import { Component, Inject } from '@angular/core';
- import { Http, Headers } from '@angular/http';
- import { Router, ActivatedRoute } from '@angular/router';
- import { EmployeeService } from '../../services/empservice.service'
- @Component({
- templateUrl: './fetchemployee.component.html'
- })
- export class FetchEmployeeComponent {
- public empList: EmployeeData[];
- constructor(public http: Http, private _router: Router, private _employeeService: EmployeeService) {
- this.getEmployees();
- }
- getEmployees() {
- this._employeeService.getEmployees().subscribe(
- data => this.empList = data
- )
- }
- delete(employeeID) {
- var ans = confirm("Do you want to delete customer with Id: " + employeeID);
- if (ans) {
- this._employeeService.deleteEmployee(employeeID).subscribe((data) => {
- this.getEmployees();
- }, error => console.error(error))
- }
- }
- }
- interface EmployeeData {
- employeeId: number;
- name: string;
- gender: string;
- city: string;
- department: string;
- }
Let’s understand this code. At the very top we have imported Angular modules and EmployeeService references. After this we have @Component decorator to define the template URL for our component.
Inside the FetchEmployeeComponent class we have declared an array variable empList of type EmployeeData where EmployeeData is an interface having the properties same as our TblEmployee Model class. Inside the getEmployees method we are calling the getEmployees method of our service EmployeeService, which will return an array of Employees to be stored in empList variable. The getEmployees method is called inside the constructor so that the employee data will be displayed as the page loads.
Next, we have delete method which accepts employeeID as parameter. This will prompt the user with a confirmation box and if the user selects yes then it will delete the employee with this employeeID.
Open fetchemployee.component.html file and put the following code into it.
- <h1>Employee Data</h1>
- <p>This component demonstrates fetching Employee data from the server.</p>
- <p *ngIf="!empList"><em>Loading...</em></p>
- <p>
- <a [routerLink]="['/register-employee']">Create New</a>
- </p>
- <table class='table' *ngIf="empList">
- <thead>
- <tr>
- <th>EmployeeId</th>
- <th>Name</th>
- <th>Gender</th>
- <th>Department</th>
- <th>City</th>
- </tr>
- </thead>
- <tbody>
- <tr *ngFor="let emp of empList">
- <td>{{ emp.employeeId }}</td>
- <td>{{ emp.name }}</td>
- <td>{{ emp.gender }}</td>
- <td>{{ emp.department }}</td>
- <td>{{ emp.city }}</td>
- <td>
- <td>
- <a [routerLink]="['/employee/edit/', emp.employeeId]">Edit</a> |
- <a [routerLink]="" (click)="delete(emp.employeeId)">Delete</a>
- </td>
- </tr>
- </tbody>
- </table>
The code for this html file is pretty simple. On the top it has a link to create new employee record and after that it will have a table to display employee data and two links for editing and deleting each employee record.
We are finished with our fetchemployee component.
Now open addemployee.component.ts file and put the following code into it:
- import { Component, OnInit } from '@angular/core';
- import { Http, Headers } from '@angular/http';
- import { NgForm, FormBuilder, FormGroup, Validators, FormControl } from '@angular/forms';
- import { Router, ActivatedRoute } from '@angular/router';
- import { FetchEmployeeComponent } from '../fetchemployee/fetchemployee.component';
- import { EmployeeService } from '../../services/empservice.service';
- @Component({
- templateUrl: './AddEmployee.component.html'
- })
- export class createemployee implements OnInit {
- employeeForm: FormGroup;
- title: string = "Create";
- employeeId: number;
- errorMessage: any;
- cityList: Array<any> = [];
- constructor(private _fb: FormBuilder, private _avRoute: ActivatedRoute,
- private _employeeService: EmployeeService, private _router: Router) {
- if (this._avRoute.snapshot.params["id"]) {
- this.employeeId = this._avRoute.snapshot.params["id"];
- }
- this.employeeForm = this._fb.group({
- employeeId: 0,
- name: ['', [Validators.required]],
- gender: ['', [Validators.required]],
- department: ['', [Validators.required]],
- city: ['', [Validators.required]]
- })
- }
- ngOnInit() {
- this._employeeService.getCityList().subscribe(
- data => this.cityList = data
- )
- if (this.employeeId > 0) {
- this.title = "Edit";
- this._employeeService.getEmployeeById(this.employeeId)
- .subscribe(resp => this.employeeForm.setValue(resp)
- , error => this.errorMessage = error);
- }
- }
- save() {
- if (!this.employeeForm.valid) {
- return;
- }
- if (this.title == "Create") {
- this._employeeService.saveEmployee(this.employeeForm.value)
- .subscribe((data) => {
- this._router.navigate(['/fetch-employee']);
- }, error => this.errorMessage = error)
- }
- else if (this.title == "Edit") {
- this._employeeService.updateEmployee(this.employeeForm.value)
- .subscribe((data) => {
- this._router.navigate(['/fetch-employee']);
- }, error => this.errorMessage = error)
- }
- }
- cancel() {
- this._router.navigate(['/fetch-employee']);
- }
- get name() { return this.employeeForm.get('name'); }
- get gender() { return this.employeeForm.get('gender'); }
- get department() { return this.employeeForm.get('department'); }
- get city() { return this.employeeForm.get('city'); }
- }
This component will be used for both adding and editing the employee data. Since we are using a form model along with client-side validation to Add and Edit customer data we have imported classes from @angular/forms. The code to create the form has been put inside the constructor so that the form will be displayed as the page loads.
This component will handle both Add and Edit request. So how will the system will differentiate between both requests? The answer is routing. We need to define two different route parameters, one for Add employee record and another to edit employee record. We will be defining these in app.shared.module.ts file shortly.
We have declared variable title to show on the top of page and variable id to store the employee id passed as the parameter in case of edit request. To read the employee id from the URL we will use ActivatedRoute.snapshot inside the constructor and set the value of variable id.
Inside ngOnInit we are performing two operations- We are fetching the list of cities by calling getCityList method from our service. We will bind the list of cities to a dropdown list in our html page. Since we are calling getCityList method in ngOnInit, the dropdown list will be populated as the page loads.
- We will check if the id is set then we will change the title to “Edit”, get the data for that id from our service and populate the fields in our form. The value read from database will be returned as JSON and have all the properties same as we declared in our FormBuilder, hence we use setValue method to populate our form.
The save method will be called on clicking on “Save” button of our form. Based on whether it is an Add operation or an Edit operation it will call the corresponding method from our service and then upon success redirect back to fetch-employee component.
In the last one we have also defined getter functions for the control names of our form to enable client-side validation.
Open addemployee.component.html file and put the following code into it:- <h1>{{title}}</h1>
- <h3>Employee</h3>
- <hr />
- <form [formGroup]="employeeForm" (ngSubmit)="save()" #formDir="ngForm" novalidate>
- <div class="form-group row">
- <label class=" control-label col-md-12">Name</label>
- <div class="col-md-4">
- <input class="form-control" type="text" formControlName="name">
- </div>
- <span class="text-danger" *ngIf="name.invalid && formDir.submitted">
- Name is required.
- </span>
- </div>
- <div class="form-group row">
- <label class="control-label col-md-12" for="Gender">Gender</label>
- <div class="col-md-4">
- <select class="form-control" data-val="true" formControlName="gender">
- <option value="">-- Select Gender --</option>
- <option value="Male">Male</option>
- <option value="Female">Female</option>
- </select>
- </div>
- <span class="text-danger" *ngIf="gender.invalid && formDir.submitted">
- Gender is required
- </span>
- </div>
- <div class="form-group row">
- <label class="control-label col-md-12" for="Department">Department</label>
- <div class="col-md-4">
- <input class="form-control" type="text" formControlName="department">
- </div>
- <span class="text-danger" *ngIf="department.invalid && formDir.submitted">
- Department is required
- </span>
- </div>
- <div class="form-group row">
- <label class="control-label col-md-12" for="City">City</label>
- <div class="col-md-4">
- <select class="form-control" data-val="true" formControlName="city">
- <option value="">--Select City--</option>
- <option *ngFor="let city of cityList"
- value={{city.cityName}}>
- {{city.cityName}}
- </option>
- </select>
- </div>
- <span class="text-danger" *ngIf="city.invalid && formDir.submitted">
- City is required
- </span>
- </div>
- <div class="form-group">
- <button type="submit" class="btn btn-default">Save</button>
- <button class="btn" (click)="cancel()">Cancel</button>
- </div>
- </form>
Here you can observe that we have attribute [formGroup]="employeeForm”, which is our defined form group name in addemployee.component.ts file. “(ngSubmit)="save()" will invoke our save method on form submit.
Also, every input control has attribute formControlName="xyz", this is used to bind FormControl to HTML. We have also defined error message for client-side validation check and it will be invoked on form submission only.
For binding the dropdown list we are using the cityList property that we have populated from the tblCities table by calling getCityList method from our service inside ngOnInit method of addemployee.component.ts file.
Open /app/app.shared.module.ts file and put the following code into it.
- import { NgModule } from '@angular/core';
- import { EmployeeService } from './services/empservice.service'
- import { CommonModule } from '@angular/common';
- import { FormsModule, ReactiveFormsModule } from '@angular/forms';
- import { HttpModule } from '@angular/http';
- import { RouterModule } from '@angular/router';
- import { AppComponent } from './components/app/app.component';
- import { NavMenuComponent } from './components/navmenu/navmenu.component';
- import { HomeComponent } from './components/home/home.component';
- import { FetchEmployeeComponent } from './components/fetchemployee/fetchemployee.component'
- import { createemployee } from './components/addemployee/AddEmployee.component'
- @NgModule({
- declarations: [
- AppComponent,
- NavMenuComponent,
- HomeComponent,
- FetchEmployeeComponent,
- createemployee,
- ],
- imports: [
- CommonModule,
- HttpModule,
- FormsModule,
- ReactiveFormsModule,
- RouterModule.forRoot([
- { path: '', redirectTo: 'home', pathMatch: 'full' },
- { path: 'home', component: HomeComponent },
- { path: 'fetch-employee', component: FetchEmployeeComponent },
- { path: 'register-employee', component: createemployee },
- { path: 'employee/edit/:id', component: createemployee },
- { path: '**', redirectTo: 'home' }
- ])
- ],
- providers: [EmployeeService]
- })
- export class AppModuleShared {
- }
Here we have also imported all our components and defined the route for our application as below
- home - which will redirect to home component
- fetch-employee - to display all employee data using fetchemployee component
- register-employee - to add new employee record using createemployee component
- employee/edit/:id - to edit existing employee record using createemployee component
- <div class='main-nav'>
- <div class='navbar navbar-inverse'>
- <div class='navbar-header'>
- <button type='button' class='navbar-toggle' data-toggle='collapse' data-target='.navbar-collapse'>
- <span class='sr-only'>Toggle navigation</span>
- <span class='icon-bar'></span>
- <span class='icon-bar'></span>
- <span class='icon-bar'></span>
- </button>
- <a class='navbar-brand' [routerLink]="['/home']">ASPCoreWithAngular</a>
- </div>
- <div class='clearfix'></div>
- <div class='navbar-collapse collapse'>
- <ul class='nav navbar-nav'>
- <li [routerLinkActive]="['link-active']">
- <a [routerLink]="['/home']">
- <span class='glyphicon glyphicon-home'></span> Home
- </a>
- </li>
- <li [routerLinkActive]="['link-active']">
- <a [routerLink]="['/fetch-employee']">
- <span class='glyphicon glyphicon-th-list'></span> Fetch employee
- </a>
- </li>
- </ul>
- </div>
- </div>
- </div>
And that’s it. We have created our first ASP.NET Core application using Angular 5 and Entity Framework core database first approach.
Execution Demo
Press F5 to launch the application.
A web page will open as shown in the image below. Notice the URL showing route for our home component. And navigation menu on the left showing navigation link for Home and Fetch Employee pages.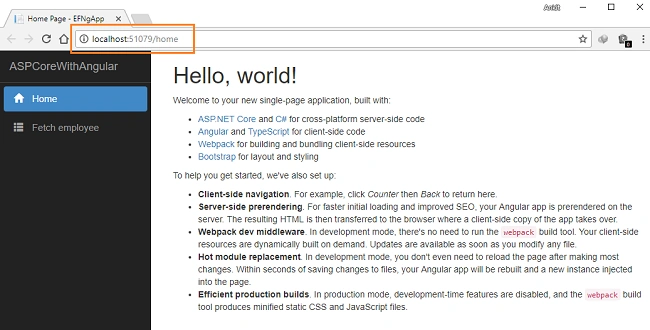
Click on Fetch Employee in the navigation menu. It will redirect to fetch employee component and displays all the employee data on the page.
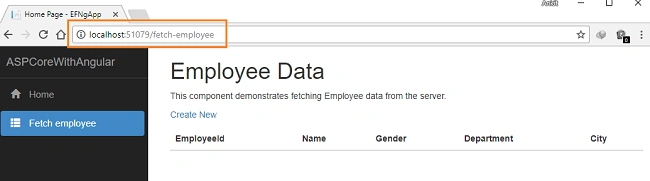
Since we have not added any data, hence it is empty.
Click on CreateNew to navigate to /register-employee page. Add a new Employee record as shown in the image below. You can observe that the City field is a dropdown list, containing all the city names that we have inserted into tblCities table.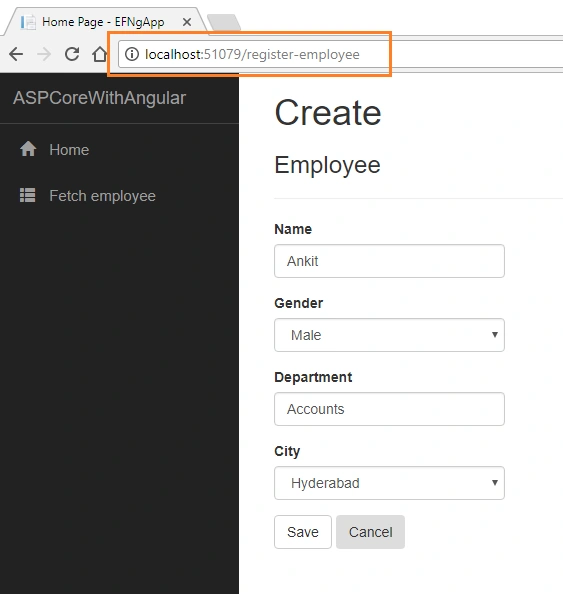
If we miss the data in any field while creating employee record, we will get a required field validation error message
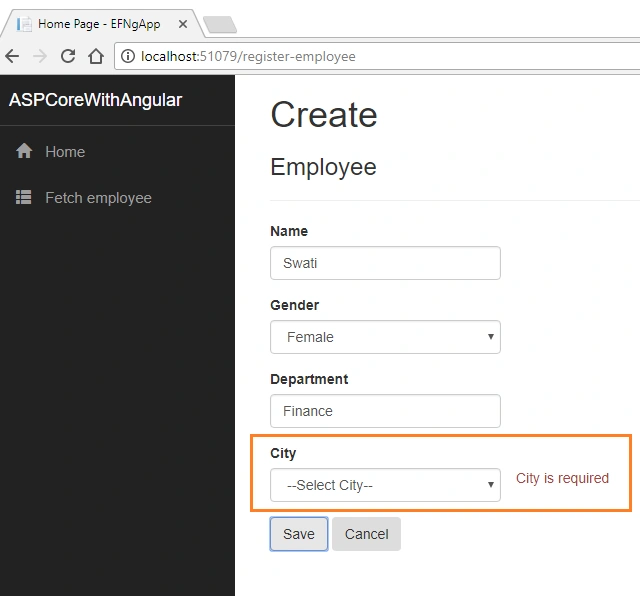
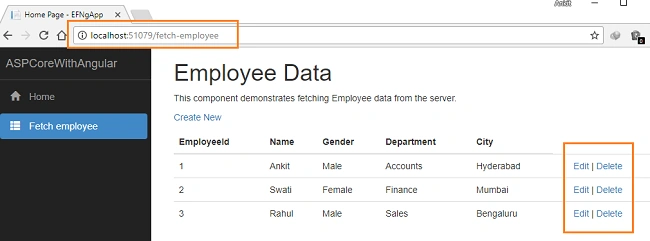
After inserting the data in all the fields, click on "Save" button. The new employee record will be created and you will be redirected to the /fetch-employee page, displaying records of all the employees. Here, we can also see action methods Edit and Delete.
If we want to edit an existing employee record, then click Edit action link. It will open Edit page as below where we can change the employee data. Notice that we have passed employee id in URL parameter.
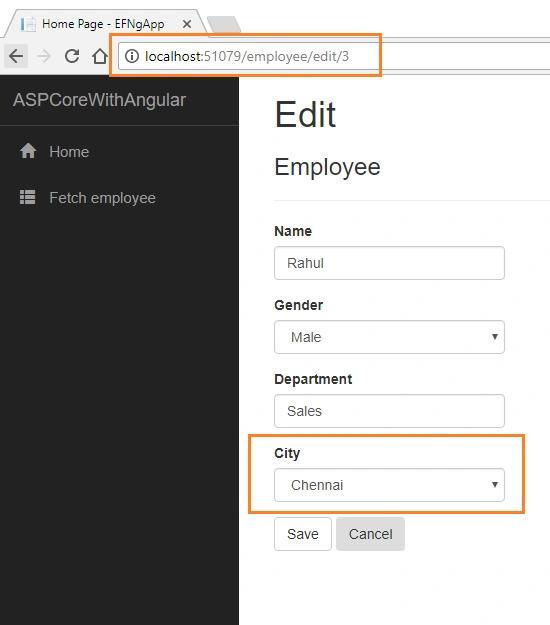
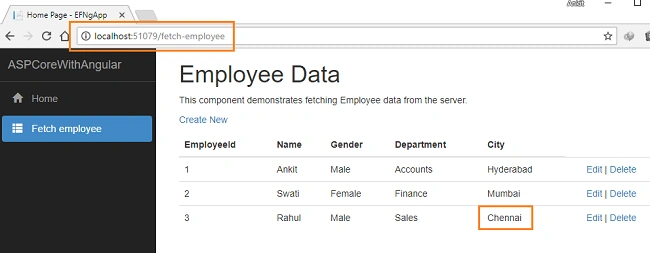
Here we have changed the City of employee Rahul from Hyderabad to Chennai. Click on "Save" to return to the fetch-employee page to see the updated changes as highlighted in the image below:
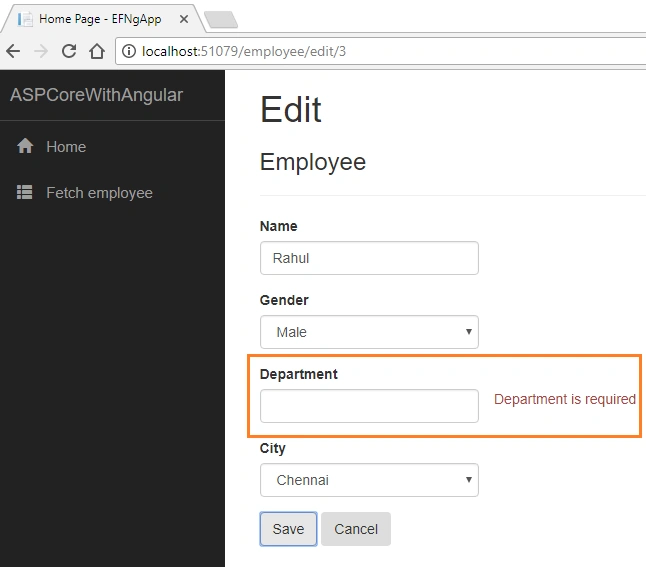
If we miss any fields while editing employee records, then Edit view will also throw required field validation error message as shown in the image below:
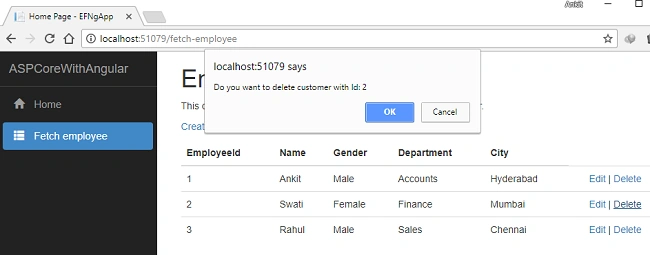
Now, we will perform Delete operation on an employee named Swati having Employee ID 2. Click on Delete action link which will open a JavaScript confirmation box asking for a confirmation to delete.
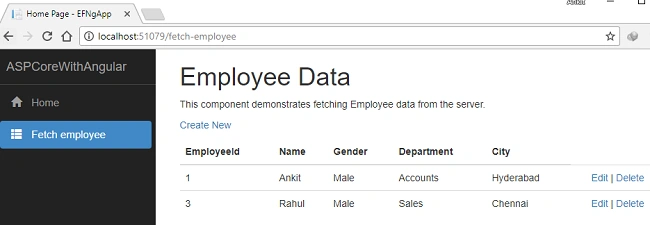
Once we click on Delete button the employee with name Swati will be removed from our record and you can see the updated list of employee as shown below.
Conclusion
We have successfully created an ASP.NET Core application using Angular 5 and Entity Framework core database first approach with the help of Visual Studio 2017 and SQL Server 2012. We have used Angular forms to get data from the user and also bind the dropdown list to database table using Entity framework.
JosephsPosted Nov 24, 2021, 1:12 PM
Not working in this article
Labeeb ahmedPosted Jul 12, 2019, 12:09 AM
.map((response: Response) ………... in ...services.ts file not working in new version of ts. .. instead … .pipe(map((response: Response) = …… has no compile error .. is that right . I am using VS2019 and latest angular... is there a new version of the same?
Lahiru madhusankhaPosted Jan 20, 2019, 11:14 AM
I'm getting 500 (Internal Server Error)
First LastPosted Dec 20, 2018, 5:49 AM
The code needs to be written to store the database connection string in the appsettings.json file. I did that and it affects 5 files.
First LastPosted Dec 14, 2018, 6:34 PM
Part 3: Is there supposed to be a node_modules folder for the Angular modules in the project?
First LastPosted Dec 14, 2018, 5:55 PM
Part 2: I downloaded your Github solution and 1st just tried to build it and I get the similar errors that I am experiencing in Part 1.
First LastPosted Dec 14, 2018, 5:54 PM
Part 1: I'm using VS 2017 community edition V 15.9.3. I chose NetCore 2.0 at application creation. I did a build and I get: Cannot find module 'C:\Dans\Work 2\Tech\Dot Net\Asp.Net Core\CRUD w Angular5 & ADO\Angular5NetcoreAdo\Angular5NetcoreAdo\node_modules\webpack\bin\webpack.js. Looks like I need webpack. However, the path here is looking for: node_modules. There is no such folder in the structure.
Gottfried StutzPosted Dec 1, 2018, 7:39 AM
There is no component folder in the angular file structure that has been created by latest Visual Studio 2017 !
Uttam ChaturvediPosted Nov 23, 2018, 5:31 AM
Very nicely explained. Thanks for sharing
Golam ShahriarPosted Sep 17, 2018, 2:43 AM
Greet Article, Bro :) You just make me an Angular Developer from Now :)
Tim MaxeyPosted Aug 2, 2018, 4:32 PM
Great article, I can run this fine, but keep getting 404 error on the headers:Headers {_headers: Map(9), _normalizedNames: Map(9)} ok : false status : 404 statusText : "Not Found" type : 2 url : "http://localhost:65294/api/Employee/Index" any ideas?
Debra HodgesPosted Aug 1, 2018, 3:14 PM
Thank you so much for writing this article and sharing it. It helped me, a regular .NET developer, learn Angular 5 with Visual Studio.
Rayees KuniyilPosted Jul 24, 2018, 2:17 AM
Nice...Well explained!!Do you have any further documentation on related deployment on IIS..
Zubair MughalPosted Jul 23, 2018, 3:29 PM
I am getting the following Error: "Must supply a value for form control with name: 'employeeId'
Desmond OshiwamboPosted Jun 25, 2018, 6:43 PM
Super example, very well explained ! I seem to be having a little issue when I run the demo in Internet Explorer. The Save operations do not seem to work, therefore I can not Add or Edit. It doesn't break, it just doesn't save the changes. In Chrome it all works fine. Any ideas ?
Biddut HossainPosted May 20, 2018, 10:38 AM
Have you any this type of example with pagination?
Sunil ChaudharyPosted May 16, 2018, 12:32 AM
Nice article Ankit, can you pls add login and signup pages without navbar..
Revathi ParvathiPosted May 8, 2018, 7:24 AM
Hi ,How to connect oracle db using this article.Please help me
Andres ChPosted May 7, 2018, 9:11 AM
Very helpful article. Like others, I am unable to publish project using Visual Studio to then set up in IIS as an application. Get errors in webpack.js command: Argument of type '"name"' is not assignable to parameter of type 'string[] | undefined'.
Gaurav MittalPosted May 4, 2018, 1:47 AM
Hi Ankit, This article is very helpful. Can you please suggest where we can put our own CSS, JS and images with this structure.
Tu HoangPosted Apr 24, 2018, 8:23 AM
Hi, Very good and helpfull article. Somehow, the dropdown city list does not get populated with data. I put a break point in the GetCities() method of EmployeeDataAccessLayer,cs but it never gets there. Any suggestions ? Thanks for you help.
Jose Hernandez RiveraPosted Apr 13, 2018, 2:18 PM
How can i deploy this app on production IIS i try but i dont have the best way about that
Alok DubeyPosted Apr 6, 2018, 8:21 AM
Amazing Writting ,,,Very helpfull ,,,
Sunil ChaudharyPosted Apr 3, 2018, 1:34 AM
Thanks for the reply, pl cover some more things in your new article like table with paging(features like jquery datatables), menus from db(use cache), global filters like mvc etc. It would be more helpful for angular beginners like me.
Sunil ChaudharyPosted Apr 2, 2018, 11:48 PM
Hi Ankit, nice article. Can we use jQuery in Angular 5 (not cdn but write and use functions) as we have in mvc?
Naresh SinghalPosted Mar 14, 2018, 8:22 AM
Fantastic Article with all new technologies....Great did @Ankit Sharma
Md NawazPosted Mar 14, 2018, 1:52 AM
Nice article, really helpful.
Rupali ShindePosted Mar 14, 2018, 1:42 AM
Hi Ankit, it will be great helpful if you publish article explaining how to publish same example code in IIS. currently im facing issue while publishing aspnet core angular 5 application in IIS
Sagar Pandurang KapPosted Mar 13, 2018, 11:35 PM
Very helpful.thank you....