

We will discuss Apache Kafka introduction, installation, working in detail, and step-by-step implementation using .NET Core 6 Web Application.
Agenda
- Overview of the Event Streaming
- Introduction of Apache Kafka
- Main concepts and foundation of Kafka
- Different Kafka APIs
- Use Cases of Apache Kafka
- Installation of Kafka on Windows 10
- Step-by-step implementation
Prerequisites
- Visual Studio 2022
- .NET Core 6 SDK
- SQL Server
- Java JDK 11
- Apache Kafka
Overview of the Event Streaming
Events are the things that happen within our application when we navigate something. Ex- We Sign up on any website and order something. So, these are the events.
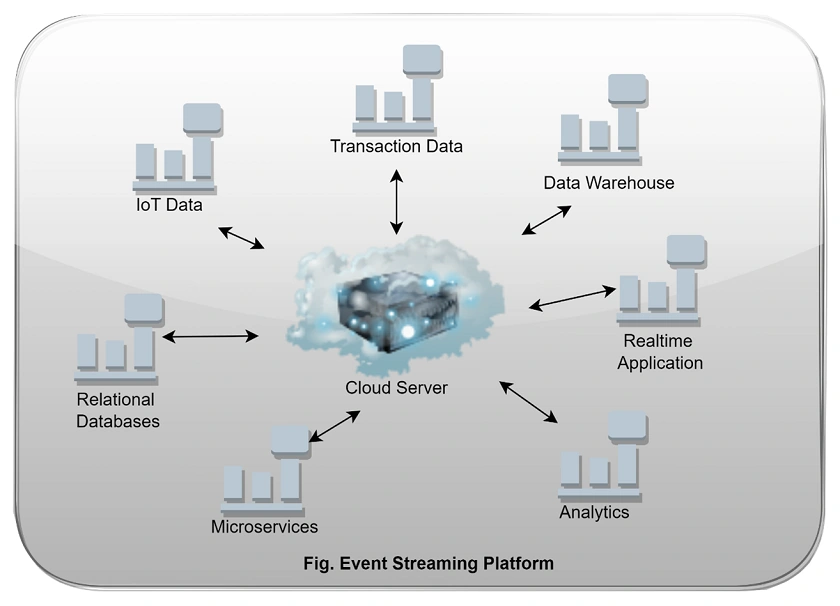
- Event streaming platform records different types of data like transaction, historical, and real-time data.
- Also, this platform is used to process events and allow the different consumers to process results immediately and timely manner.
- Event-driven platform allows us to monitor our business and real-time data from different types of devices like IoT and many more, after analyzing it provides a good customer experience based on different types of events and needs.
Introduction of Apache Kafka
- Kafka is a distributed event store and stream-processing platform.
- Kafka is an open source and is written in Java and Scala.
- The main purpose to designed Kafka by Apache foundation is to handle real-time data feeds and provide high throughput and low latency platforms.
- Kafka is an event streaming platform that has many capabilities to publish(write) and subscribe to (read) streams of events from a different system.
- Also, to store and process events durably as long as we want, by default Kafka store event 7 days of the time period but we can increase that as per need and requirement.
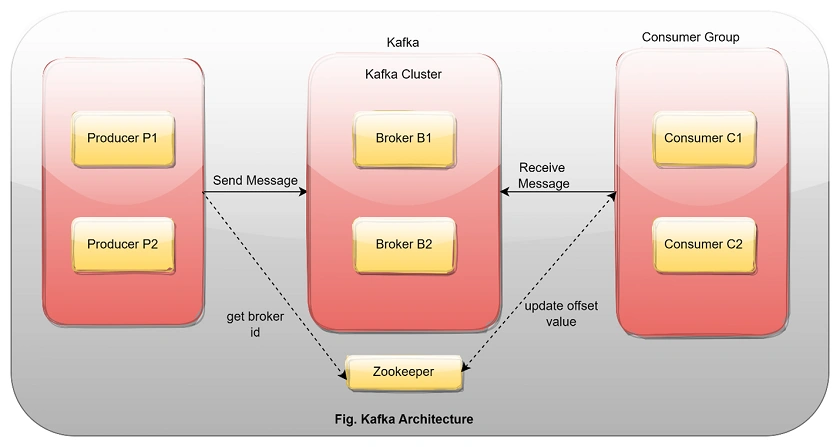
- Kafka has distributed system which has servers and clients that can communicate via TCP protocol.
- It can be deployed on different virtual machines and containers in on-premise as well as cloud environments as per requirements.
- In the Kafka world, a producer sends messages to the Kafka broker and the messages will get stored inside the topics and the consumer subscribes to that topic to consume messages sent by producer.
- Zookeeper is used to manage metadata of kafka related things. it tracks which brocker are part of kafka cluster and partitions of different topics. Also, manage the status of kafka nodes and maintain list of kafka topics and list of messages.
Main concepts and foundation of Kafka
1. Event
An event or record is the message which we read and write to the Kafka server we do this in form of events in our business world and it contains key, value, timestamp, and other metadata headers.
Key: “Jaydeep”
Value: “Booked BMW”
Event Timestamp: "Dec. 11, 2022, at 12:00 p.m."
2. Producer
The producer is a client application that sends messages to the Kafka Node/Broker.
3. Consumer
The consumer is an application that receives data from Kafka.
4. Kafka Cluster
The Kafka cluster is the set of computers that share the workload with each other and serve some purpose.
5. Broker
The broker is a Kafka Server that acts as an agent between both the producer and consumer communicate via the broker.
6. Topic
The events are stored inside the Topic it’s similar to our folder in which we store multiple files.
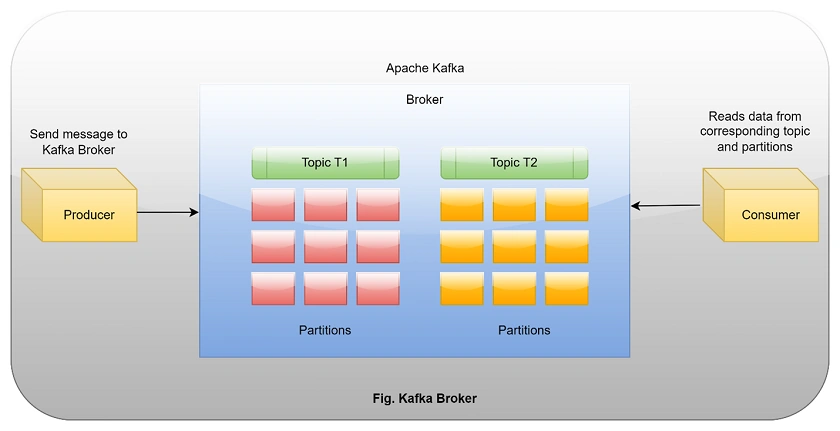
- Each topic has one or more producers and consumer which write and reads data from the topic.
- Events in topic we can read as often as needed it persists events and it’s not like another messaging system that removes messages after consuming that.
7. Partitions
Topics are partitions means the topic is spread over multiple partitions which we created inside the topic. When the producer sends some event to the Topic it will store it inside the particular partitions and then the consumer can able to read the event from the corresponding topic partition in sequence.
8. Offset
Kafka assigns one unique Id to the message which is getting stored inside the topic partition when the message will arrive from the producer.
9. Consumer Groups
In the Kafka world, the consumer group acts as a single logical unit.
10. Replica
In Kafka to make data fault-tolerant and highly available, we can replicate topics in different regions and brokers. So, in case something wrong happens with data in one topic we can easily get that from another where replicate the same.
Different Kafka APIs
Kafka has five core APIs which serve different purposes
Admin API
This API manages different topics, brokers, and Kafka objects
Producer API
This API is used to write/publish events to different Kafka topics
Consumer API
This API is used to receive the different messages corresponding to the topics which are subscribed by the consumer
Kafka Stream API
This API is used to perform different types of operations like windowing, joins and aggregation, and many others. Basically, it uses to transform objects.
Kafka Connect API
This API is work as connected to Kafka which helps different systems to connect with Kafka easily, it has different types of ready-to-use connectors related to Kafka.
Use Cases of Apache Kafka
- Messaging
- User Activity Tracking
- Log Aggregation
- Stream Processing
- Realtime Data Analytics
Installation of Kafka on Windows 10
Step 1
Download and install Java SDK of version 8 or more. (Note: I have Java 11 that’s why I put the same path in all commands which I used over here)
https://www.oracle.com/java/technologies/downloads/#java8
Step 2
Open and install exe
Step 3
Set environment variable for Java using the command prompt as admin.
setx -m JAVA_HOME "C:\Program Files\Java\jdk-11.0.16.1"
setx -m PATH "%JAVA_HOME%\bin;%PATH%"
Step 4
After that, download and install Kafka
https://kafka.apache.org/downloads
Step 5
Extract the downloaded Kafka file at rename it as Kafka.
Step 6
Open D:\Kafka\config\ and create a zookeeper-data and kafka-logs folder inside that.
Step 7
Next, open D:\Kafka\config\zookeeper.properties file and add the folder path inside that.
D:\Kafka\config\zookeeper.properties
dataDir=D:/Kafka/zookeeper-data
Step 8
After that, open D:\Kafka\config\server.properties file and change the log path over there
D:\Kafka\config\server.properties
log.dirs=D:/Kafka/kafka-logs
Step 9
Saves and closes both files.
Step 10
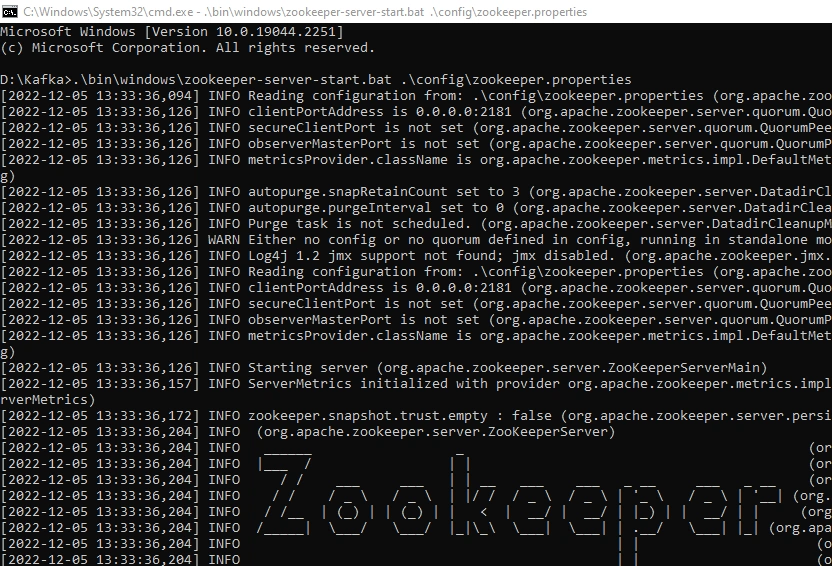
Run zookeeper
D:\Kafka> .\bin\windows\zookeeper-server-start.bat .\config\zookeeper.properties
Step 11
Start Kafka
D:\Kafka> .\bin\windows\kafka-server-start.bat .\config\server.properties

Step 12
Create Kafka Topic
D:\Kafka\bin\windows>kafka-topics.bat --create --bootstrap-server localhost:9092 --replication-factor 1 --partitions 1 --topic testdata

Step 13
Create a producer and send some message after you started both producer and consumer.
D:\Kafka\bin\windows>kafka-console-producer.bat --broker-list localhost:9092 --topic testdata

Step 14
Next, Create a Consumer and you can see a message when the producer sent.
D:\Kafka\bin\windows>kafka-console-consumer.bat --bootstrap-server localhost:9092 --topic testdata

Step-by-step implementation
Let’s start with practical implementation
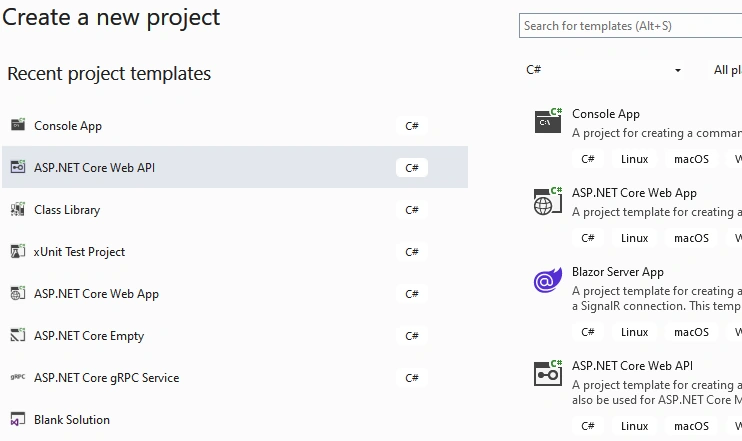
Step 1
Create a new .NET Core Producer Web API
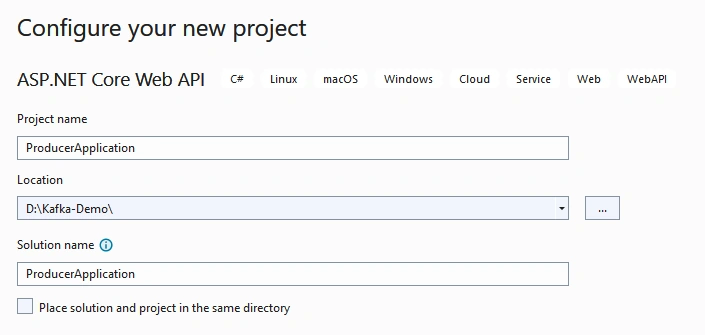
Step 2
Configure your application
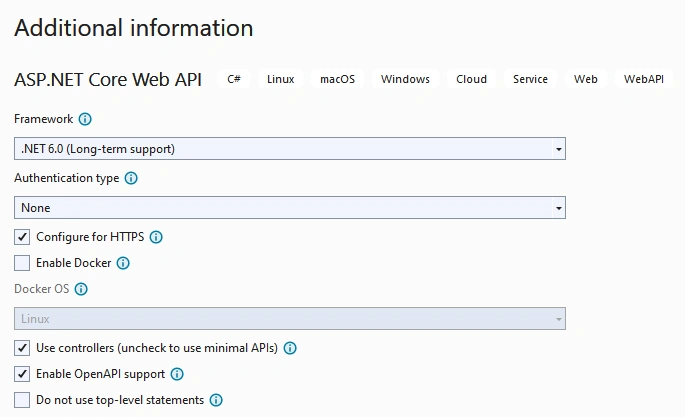
Step 3
Provide additional details
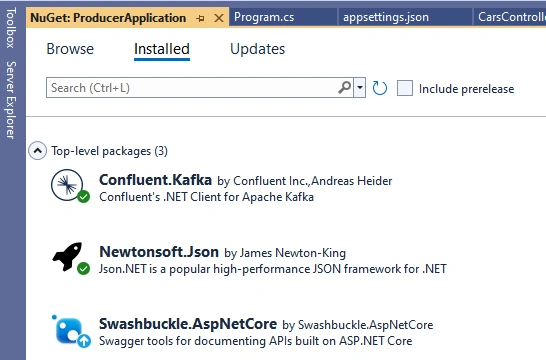
Step 4
Install the following two NuGet packages
Step 5
Add configuration details inside the appsettings.json file
{
  "Logging": {
    "LogLevel": {
      "Default": "Information",
      "Microsoft.AspNetCore": "Warning"
    }
  },
  "AllowedHosts": "*",
  "producerconfiguration": {
    "bootstrapservers": "localhost:9092"
  },
  "TopicName": "testdata"
}
Step 6
Register a few services inside the Program class
using Confluent.Kafka;

var builder = WebApplication.CreateBuilder(args);

// Add services to the container.
var producerConfiguration = new ProducerConfig();
builder.Configuration.Bind("producerconfiguration", producerConfiguration);

builder.Services.AddSingleton<ProducerConfig>(producerConfiguration);

builder.Services.AddControllers();
// Learn more about configuring Swagger/OpenAPI at https://aka.ms/aspnetcore/swashbuckle
builder.Services.AddEndpointsApiExplorer();
builder.Services.AddSwaggerGen();

var app = builder.Build();

// Configure the HTTP request pipeline.
if (app.Environment.IsDevelopment())
{
    app.UseSwagger();
    app.UseSwaggerUI();
}

app.UseHttpsRedirection();

app.UseAuthorization();

app.MapControllers();

app.Run();
Step 7
Next, Create CarDetails model class
using Microsoft.AspNetCore.Authentication;

namespace ProducerApplication.Models
{
    public class CarDetails
    {
        public int CarId { get; set; }
        public string CarName { get; set; }
        public string BookingStatus { get; set; }
    }
}
Step 8
Now, create CarsController
using Confluent.Kafka;
using Microsoft.AspNetCore.Mvc;
using Microsoft.Extensions.Configuration;
using Newtonsoft.Json;
using ProducerApplication.Models;

namespace ProducerApplication.Controllers
{
    [Route("api/[controller]")]
    [ApiController]
    public class CarsController : ControllerBase
    {
        private ProducerConfig _configuration;
        private readonly IConfiguration _config;
        public CarsController(ProducerConfig configuration, IConfiguration config)
        {
            _configuration = configuration;
            _config = config;
        }
        [HttpPost("sendBookingDetails")]
        public async Task<ActionResult> Get([FromBody] CarDetails employee)
        {
            string serializedData = JsonConvert.SerializeObject(employee);

            var topic = _config.GetSection("TopicName").Value;

            using (var producer = new ProducerBuilder<Null, string>(_configuration).Build())
            {
                await producer.ProduceAsync(topic, new Message<Null, string> { Value = serializedData });
                producer.Flush(TimeSpan.FromSeconds(10));
                return Ok(true);
            }
        }
    }
}
Step 9
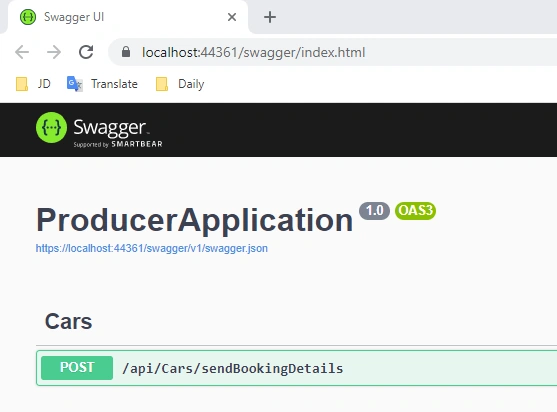
Finally, run the application and send a message
Step 10
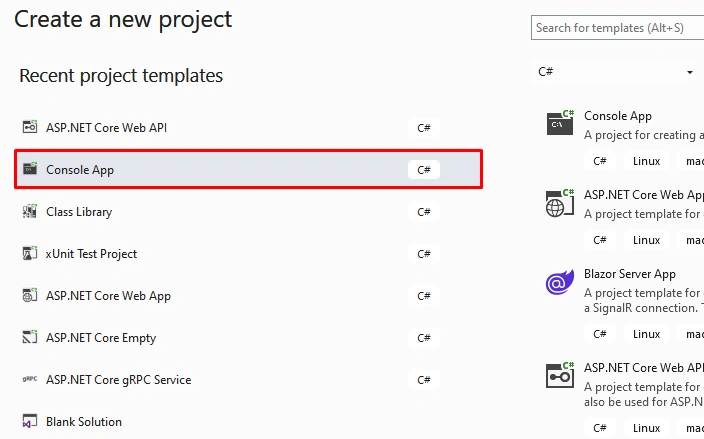
Now, create a Consumer application
For that, Create a new .NET Core Console Application
Step 11
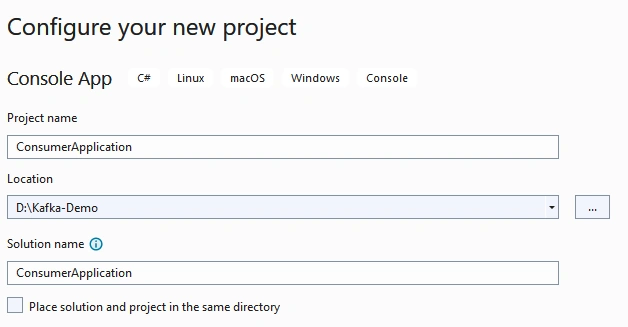
Configure your application
Step 12
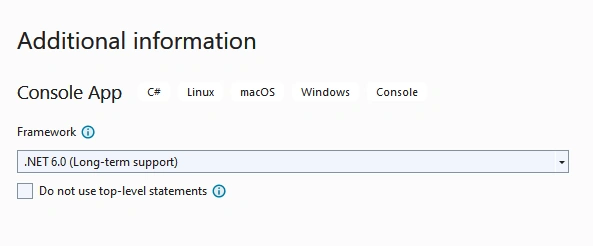
Provide additional information
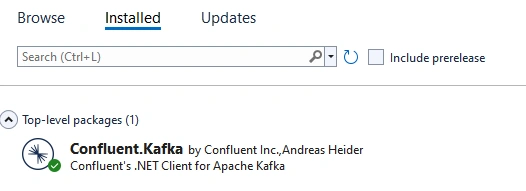
Step 13
Install this NuGet
Step 14
Add the following code which consumes messages sent by the consumer.
using Confluent.Kafka;

var config = new ConsumerConfig
{
    GroupId = "gid-consumers",
    BootstrapServers = "localhost:9092"
};

using (var consumer = new ConsumerBuilder<Null, string>(config).Build())
{
    consumer.Subscribe("testdata");
    while (true)
    {
        var bookingDetails = consumer.Consume();
        Console.WriteLine(bookingDetails.Message.Value);
    }
}
Step 15
Finally, run both producer and consumer, sent message using producer app and you can see the message immediately inside consumer console sent by producer

GitHub URL
https://github.com/Jaydeep-007/Kafka-Demo
Conclusion
Here we discussed Apache Kafka introduction, working, benefits, and step-by-step implementation using .NET Core 6.
Happy Coding!
Mostafa EyniPosted Mar 18, 2023, 2:51 PM
Thank you for these beautiful articles
Mostafa EyniPosted Mar 18, 2023, 2:50 PM
You are the best