

Create Angular JS App
Now it is time to create angular js [Single Page Application] in shore SPA. Here we will be using API service to perform CRUD operations using angular js. Create a folder named with "App" and inside this folder create two JS files like "app.js" and "EmployeeController.js".
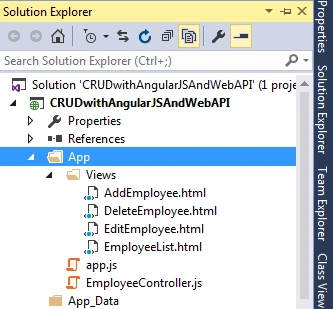
You need to create Views folder inside the App folder and create 4 html template files for CRUD operations as following image.
App.Js
As we know, an Angular JS application runs inside the ng-app directive. So, the first step is to create routing for angular js app.
App.Js
As we know, an Angular JS application runs inside the ng-app directive. So, the first step is to create routing for angular js app.
- var app = angular.module('myApp', ['ngRoute']);
- app.config(['$locationProvider', '$routeProvider', function ($locationProvider, $routeProvider) {
- $routeProvider.when('/EmployeeList', { //Routing for show list of employee
- templateUrl: '/App/Views/EmployeeList.html',
- controller: 'EmployeeController'
- }).when('/AddEmployee', { //Routing for add employee
- templateUrl: '/App/Views/AddEmployee.html',
- controller: 'EmployeeController'
- })
- .when('/EditEmployee/:empId', { //Routing for geting single employee details
- templateUrl: '/App/Views/EditEmployee.html',
- controller: 'EmployeeController'
- })
- .when('/DeleteEmployee/:empId', { //Routing for delete employee
- templateUrl: '/App/Views/DeleteEmployee.html',
- controller: 'EmployeeController'
- })
- .otherwise({ //Default Routing
- controller: 'EmployeeController'
- })
- }]);
Now to perform CRUD operations on client side, we need to add EmployeeController.js file which will hanlde all the CRUD opertions with http services.
- app.controller("EmployeeController", ['$scope', '$http', '$location', '$routeParams', function ($scope, $http, $location, $routeParams) {
- $scope.ListOfEmployee;
- $scope.Status;
- $scope.Close = function () {
- $location.path('/EmployeeList');
- }
- //Get all employee and bind with html table
- $http.get("api/employee/GetAllEmployee").success(function (data) {
- $scope.ListOfEmployee = data;
- })
- .error(function (data) {
- $scope.Status = "data not found";
- });
- //Add new employee
- $scope.Add = function () {
- var employeeData = {
- FirstName: $scope.FirstName,
- LastName: $scope.LastName,
- Address: $scope.Address,
- Salary: $scope.Salary,
- DOB: $scope.DOB,
- // DepartmentID: $scope.DepartmentID
- };
- debugger;
- $http.post("api/employee/AddEmployee", employeeData).success(function (data) {
- $location.path('/EmployeeList');
- }).error(function (data) {
- console.log(data);
- $scope.error = "Something wrong when adding new employee " + data.ExceptionMessage;
- });
- }
- //Fill the employee records for update
- if ($routeParams.empId) {
- $scope.Id = $routeParams.empId;
- $http.get('api/employee/GetEmployee/' + $scope.Id).success(function (data) {
- $scope.FirstName = data.FirstName;
- $scope.LastName = data.LastName;
- $scope.Address = data.Address;
- $scope.Salary = data.Salary;
- $scope.DOB = data.DOB
- //$scope.DepartmentID = data.DepartmentID
- });
- }
- //Update the employee records
- $scope.Update = function () {
- debugger;
- var employeeData = {
- EmployeeID: $scope.Id,
- FirstName: $scope.FirstName,
- LastName: $scope.LastName,
- Address: $scope.Address,
- Salary: $scope.Salary,
- DOB: $scope.DOB
- //DepartmentID: $scope.DepartmentID
- };
- if ($scope.Id > 0) {
- $http.put("api/employee/UpdateEmployee", employeeData).success(function (data) {
- $location.path('/EmployeeList');
- }).error(function (data) {
- console.log(data);
- $scope.error = "Something wrong when adding updating employee " + data.ExceptionMessage;
- });
- }
- }
- //Delete the selected employee from the list
- $scope.Delete = function () {
- if ($scope.Id > 0) {
- $http.delete("api/employee/DeleteEmployee/" + $scope.Id).success(function (data) {
- $location.path('/EmployeeList');
- }).error(function (data) {
- console.log(data);
- $scope.error = "Something wrong when adding Deleting employee " + data.ExceptionMessage;
- });
- }
- }
- }]);
Employee List
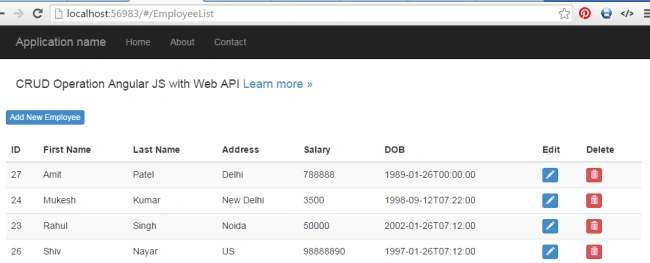
To see the employee list, we need to create EmployeeList.html page.
- <a href="#/AddEmployee" class="btn btn-primary btn-xs" >Add New Employee</a>
- <br /><br />
- <div class="table-responsive">
- <table id="mytable" class="table table-bordred table-striped">
- <thead>
- <th>ID</th>
- <th>First Name</th>
- <th>Last Name</th>
- <th>Address</th>
- <th>Salary</th>
- <th>DOB</th>
- <!--<th>Department</th>-->
- <th>Edit</th>
- <th>Delete</th>
- </thead>
- <tbody>
- <tr ng-repeat="item in ListOfEmployee">
- <td>{{item.EmployeeID}}</td>
- <td>{{item.FirstName}}</td>
- <td>{{item.LastName}}</td>
- <td>{{item.Address}}</td>
- <td>{{item.Salary}}</td>
- <td>{{item.DOB}}</td>
- <!--<td>{{item.DepartmentName}}</td>-->
- <td><a class="btn btn-primary btn-xs" href="#/EditEmployee/{{item.EmployeeID}}">
- <span class="glyphicon glyphicon-pencil"></span></a></td>
- <td><a class="btn btn-danger btn-xs" href="#/DeleteEmployee/{{item.EmployeeID}}">
- <span class="glyphicon glyphicon-trash"></span></a></td>
- </tr>
- </tbody>
- </table>
- </div>
Add Employee
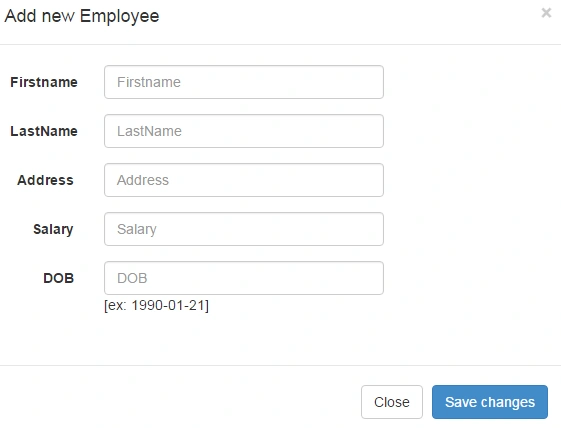
To add new employe with Angular JS application, we just need to create one more template page with name"AddEmployee.html" as following.
- <div id="add" tabindex="-1" role="dialog" aria-labelledby="add-modal-label">
- <div class="modal-dialog" role="document">
- <div class="modal-content">
- <form class="form-horizontal" id="add-form">
- <div class="modal-header">
- <button type="button" class="close" data-dismiss="modal" aria-label="Close"><span aria-hidden="true">×</span></button>
- <h4 class="modal-title" id="add-modal-label">Add new Employee</h4>
- </div>
- <div class="modal-body">
- <div class="form-group">
- <label for="add-firstname" class="col-sm-2 control-label">Firstname</label>
- <div class="col-sm-10">
- <input type="text" class="form-control" id="add-firstname" name="firstname" placeholder="Firstname" ng-model="FirstName" required>
- </div>
- </div>
- <div class="form-group">
- <label for="add-lastname" class="col-sm-2 control-label">LastName</label>
- <div class="col-sm-10">
- <input type="text" class="form-control" id="add-lastname" name="lastName" placeholder="LastName" ng-model="LastName" required>
- </div>
- </div>
- <div class="form-group">
- <label for="add-address" class="col-sm-2 control-label">Address</label>
- <div class="col-sm-10">
- <input type="text" class="form-control" id="add-address" name="address" placeholder="Address" ng-model="Address">
- </div>
- </div>
- <div class="form-group">
- <label for="add-salary" class="col-sm-2 control-label">Salary</label>
- <div class="col-sm-10">
- <input type="text" class="form-control" id="add-salary" name="mobile" placeholder="Salary" ng-model="Salary" required>
- </div>
- </div>
- <div class="form-group">
- <label for="add-dob" class="col-sm-2 control-label">DOB</label>
- <div class="col-sm-10">
- <input type="text" class="form-control" id="add-dob" name="mobile" placeholder="DOB" ng-model="DOB" required> [ex: 1990-01-21]
- </div>
- </div>
- </div>
- <div class="modal-footer">
- <button type="button" class="btn btn-default" data-dismiss="modal" ng-click="Close()">Close</button>
- <button type="submit" class="btn btn-primary" ng-click="Add()">Save changes</button>
- </div>
- </form>
- </div>
- </div>
- </div>
Update Employee
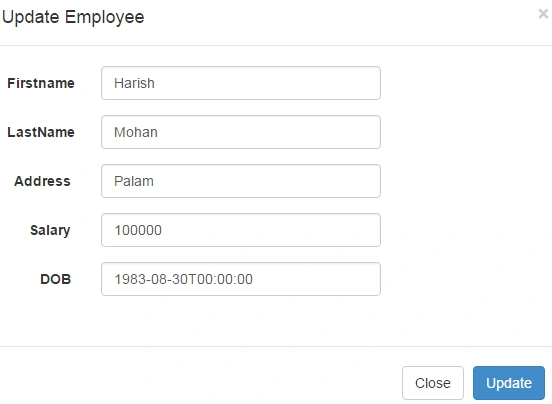
From the employee list page, there is button to edit/update the employee list. To click on any, you can update the respected details for that employee. Create the EditEmployee.html page as following.
- <div id="edit" aria-labelledby="edit" aria-hidden="true">
- <div class="modal-dialog">
- <div class="modal-content">
- <form class="form-horizontal" id="edit-form">
- <div class="modal-header">
- <button type="button" class="close" data-dismiss="modal" aria-label="Close"><span aria-hidden="true">×</span></button>
- <h4 class="modal-title" id="edit-modal-label">Update Employee</h4>
- </div>
- <div class="modal-body">
- <div class="form-group">
- <label for="edit-firstname" class="col-sm-2 control-label">Firstname</label>
- <div class="col-sm-10">
- <input type="text" class="form-control" id="edit-firstname" name="firstname" placeholder="Firstname" ng-model="FirstName" required>
- </div>
- </div>
- <div class="form-group">
- <label for="edit-lastname" class="col-sm-2 control-label">LastName</label>
- <div class="col-sm-10">
- <input type="text" class="form-control" id="edit-lastname" name="lastName" placeholder="LastName" ng-model="LastName">
- </div>
- </div>
- <div class="form-group">
- <label for="edit-address" class="col-sm-2 control-label">Address</label>
- <div class="col-sm-10">
- <input type="text" class="form-control" id="edit-address" name="address" placeholder="Address" ng-model="Address">
- </div>
- </div>
- <div class="form-group">
- <label for="edit-salary" class="col-sm-2 control-label">Salary</label>
- <div class="col-sm-10">
- <input type="text" class="form-control" id="edit-salary" name="mobile" placeholder="Salary" ng-model="Salary">
- </div>
- </div>
- <div class="form-group">
- <label for="edit-dob" class="col-sm-2 control-label">DOB</label>
- <div class="col-sm-10">
- <input type="text" class="form-control" id="edit-dob" name="mobile" placeholder="DOB" ng-model="DOB">
- </div>
- </div>
- </div>
- <div class="modal-footer">
- <button type="button" class="btn btn-default" ng-click="Close()">Close</button>
- <button type="submit" class="btn btn-primary" ng-click="Update()">Update</button>
- </div>
- </form>
- </div>
- <!-- /.modal-content -->
- </div>
- <!-- /.modal-dialog -->
- </div>
Delete Employee
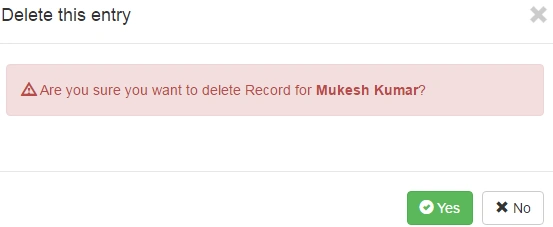
To delete the employee, just click on delete button to delete respective employee. I have createdDeleteEmployee.html page.
- <div id="delete" ng-controller="EmployeeController">
- <div class="modal-dialog">
- <div class="modal-content">
- <div class="modal-header">
- <button type="button" class="close" data-dismiss="modal" aria-hidden="true"><span class="glyphicon glyphicon-remove" aria-hidden="true"></span></button>
- <h4 class="modal-title custom_align" id="Heading">Delete this entry</h4>
- </div>
- <div class="modal-body">
- <div class="alert alert-danger"><span class="glyphicon glyphicon-warning-sign"></span> Are you sure you want to delete Record for <b>{{FirstName + " "+LastName}}</b>?</div>
- </div>
- <div class="modal-footer ">
- <button type="submit" class="btn btn-success" ng-click="Delete()"><span class="glyphicon glyphicon-ok-sign"></span> Yes</button>
- <button type="button" class="btn btn-default" ng-click="Close()"><span class="glyphicon glyphicon-remove"></span> No</button>
- </div>
- </div>
- <!-- /.modal-content -->
- </div>
- <!-- /.modal-dialog -->
- </div>
Conclusion
So, today we have learned how to create a Web API and how to create an Angular JS and perform CRUD operations.
I hope this post will help you. Please put your feedback using comments which helps me to improve myself for the next post. If you have any doubts please ask your doubts or query in the comment section and If you like this post, please share it with your friends.
Naweed syedPosted Sep 15, 2016, 9:59 AM
Very useful article thanks
Rafael MinierPosted Sep 14, 2016, 8:27 AM
Great article! Can you explain how to bring related data? Thanks!
Mukesh KumarPosted Sep 8, 2016, 7:49 AM
Sure, I will make a sample example using Angular 2 and will post.
Murali KrishnanPosted Sep 8, 2016, 6:32 AM
Please use angular 2 and share some example.