

Introduction
In this article, we will learn how to add texture to photos using HTML5 and JavaScript tools. We will begin with a small discussion of HTML. HTML is an acronym for "HyperText Markup Language" used to display data in a browser. HTML5 is an advanced version of HTML used to develop multimedia and animated applications. In a previous article, we used JavaScript. JavaScript was designed to add interactivity to HTML pages. JavaScript is usually embedded directly into HTML pages. I hope this article helps to show how to add texture to photos using HTML5 and JavaScript tools. If you are interested in adding texture to photos in your applications then go through the following steps.
Step 1: Open Visual Studio.
- Go to file -> New->Projects.
- Create an ASP. NET Web Application.
- Name of "Texture.aspx".


- Right-click on the Solution Explorer.
- Add->add new item->HTML form.
- The Name of the HTML form is "Photos.html".
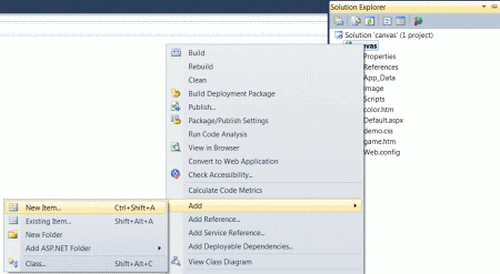
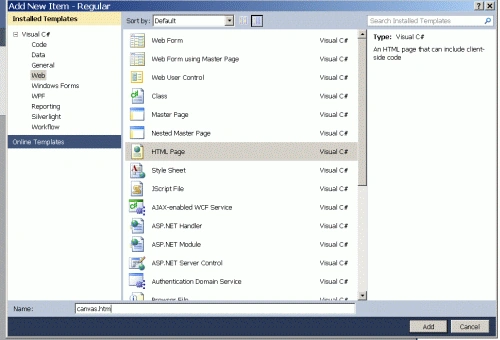
- Right-click on the Solution Explorer.
- Add-> Add New Folder.
- Set the name of the folder as "image".


Code
- function Img()
- {
- canvas = document.getElementById("myCanvas");
- if (canvas.getContext)
- {
- pxt = canvas.getContext("2d");
- MyImg.onload = function ()
- {
- pxt.drawImage(MyImg, 0, 0);
- ImgChange();
- }
- MyImg.src = "image/2.jpg";
- }
- }
Step 5: In this section, we create a function named "ImgChange" that is used to set a texture and texture color on an image.
Code
- function ImgChange()
- {
- for (i = 0; i <= 1000; i++)
- {
- var x = Math.floor(Math.random() * 500);
- var y = Math.floor(Math.random() * 500);
- pxt.fillStyle = "white";
- pxt.beginPath();
- pxt.arc(x, y, 3, 0, Math.PI * 2, true);
- pxt.closePath();
- pxt.fill();
- }
- }
Step 6: In this section, we set a body part of a texture application.
Code
- <body onload="Img()" bgcolor="#cc6699">
- <h1>
- Tom application
- </h1>
- <img id="myPhoto" src="image/2.jpg">
- <canvas id="myCanvas" width="386" height="255">
- </canvas>
- </body>

Code
- <html>
- <head>
- <title>Tom developed a </title>
- <script type="text/javascript">
- var MyImg = new Image();
- function Img()
- {
- canvas = document.getElementById("myCanvas");
- if (canvas.getContext)
- {
- pxt = canvas.getContext("2d");
- MyImg.onload = function ()
- {
- pxt.drawImage(MyImg, 0, 0);
- ImgChange();
- }
- MyImg.src = "image/2.jpg";
- }
- }
- function ImgChange()
- {
- for (i = 0; i <= 1000; i++)
- {
- var x = Math.floor(Math.random() * 500);
- var y = Math.floor(Math.random() * 500);
- pxt.fillStyle = "white";
- pxt.beginPath();
- pxt.arc(x, y, 3, 0, Math.PI * 2, true);
- pxt.closePath();
- pxt.fill();
- }
- }
- </script>
- <style type="text/css">
- #myPhoto
- {
- width: 386px;
- height: 255px;
- }
- </style>
- </head>
- <body onload="Img()" bgcolor="#cc6699">
- <h1>
- Tom application
- </h1>
- <img id="myPhoto" src="image/2.jpg">
- <canvas id="myCanvas" width="386" height="255">
- </canvas>
- </body>
- </html>
Step 8: Press Ctrl + F5 to run an application in a browser.
Output
This is an original image.

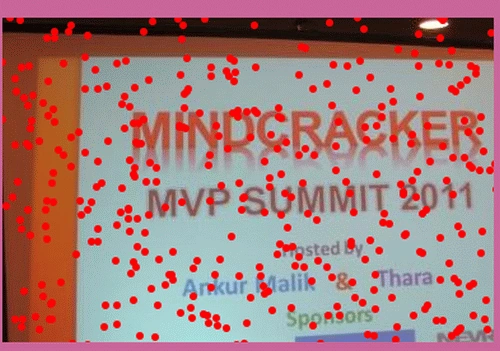
This a texture image.


Here are some useful resources:
Join the conversation! Your thoughts help the community grow.