
Introduction
Fragments
Fragments are more used for the user interface benefit. Fragments are used when the user wants to see two different views of two different classes on the same screen. Fragments were added to Android when Honeycomb was launched. So if you are developing an application only for Android 3.0 (HoneyComb) or higher then Android provides you access to the Fragments class. You can also access the FragmentManager by calling the getFragmnetManager() method in your Activities.
- oncreate(): The system calls this method when the Fragment is created.
- onCreateView(): The system calls this method when Android needs the Layout for the Fragment.
- onPause(): The system calls this method when the user leaves the Fragment. But it does not mean that the Fragment will be destroyed.
Most applications apply this method to use Fragments in its application. But you can use various methods depending on your needs.
Step 1
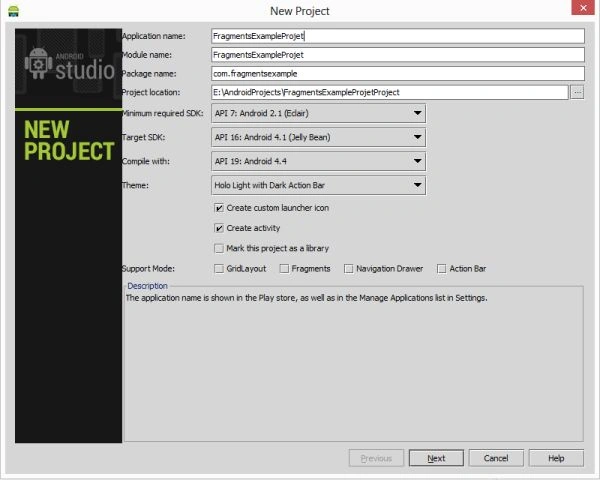
Create a project like this:
 Step 2
Create an XML file with the following.
In this, you will use a Fragment to hold the Layout in an Activity. In the android:name="com.fragmentactivityproject.Second" property you will that class with a package name that you want to show on the activity at run time.
Step 2
Create an XML file with the following.
In this, you will use a Fragment to hold the Layout in an Activity. In the android:name="com.fragmentactivityproject.Second" property you will that class with a package name that you want to show on the activity at run time.
- <RelativeLayout xmlns:android="http://schemas.android.com/apk/res/android"
- xmlns:tools="http://schemas.android.com/tools"
- android:layout_width="fill_parent"
- android:layout_height="fill_parent"
- tools:context=".MainActivity"
- android:background="#ffab52">
- <fragment
- android:layout_width="150dp"
- android:layout_height="wrap_content"
- android:name="com.fragmentactivityproject.Second"
- android:id="@+id/fragment"
- android:layout_centerInParent="true"
- tools:layout="@layout/activity_main" />
- </RelativeLayout>
Step 3
Create another XML file with the following.
In this Activity I have used three buttons, you can create your Layout depending on your needs.
- <?xml version="1.0" encoding="utf-8"?>
- <LinearLayout xmlns:android="http://schemas.android.com/apk/res/android"
- android:orientation="vertical"
- android:layout_width="fill_parent"
- android:background="#000000"
- android:layout_height="fill_parent">
- <Button
- android:text="Button1"
- android:textStyle="bold"
- android:layout_height="wrap_content"
- android:layout_width="wrap_content"
- android:textSize="30dp"
- android:ems="8"
- android:id="@+id/button1"
- android:textColor="#ffab52"
- android:layout_gravity="center_horizontal"/>
- <Button
- android:id="@+id/Button2"
- android:text="Button2"
- android:textStyle="bold"
- android:ems="8"
- android:layout_height="wrap_content"
- android:layout_width="wrap_content"
- android:textSize="30dp"
- android:textColor="#ffab52"
- android:layout_gravity="center_horizontal"/>
- <Button
- android:id="@+id/Button3"
- android:text="Button3"
- android:textStyle="bold"
- android:ems="8"
- android:layout_height="wrap_content"
- android:layout_width="wrap_content"
- android:textSize="30dp"
- android:textColor="#ffab52"
- android:layout_gravity="center_horizontal"/>
- </LinearLayout>
Step 4
Create a Java class file with the following.
This is your rmainActivity class that will hold your Layout at runtime.
- package com.fragmentactivityproject;
- import android.annotation.TargetApi;
- import android.app.FragmentManager;
- import android.app.FragmentTransaction;
- import android.os.Build;
- import android.os.Bundle;
- import android.app.Activity;
- import android.support.v4.app.FragmentActivity;
- import android.view.Menu;
- public class MainActivity extends FragmentActivity {
- @Override
- protected void onCreate(Bundle savedInstanceState) {
- super.onCreate(savedInstanceState);
- setContentView(R.layout.activity_main);
- }
- @Override
- public boolean onCreateOptionsMenu(Menu menu) {
- // Inflate the menu; this adds items to the action bar if it is present.
- getMenuInflater().inflate(R.menu.main, menu);
- return true;
- }
- }
Step 5
Create another Java class file with the following.
- package com.fragmentactivityproject;
- import android.annotation.TargetApi;
- import android.app.FragmentTransaction;
- import android.support.v4.app.Fragment;
- import android.os.Build;
- import android.os.Bundle;
- import android.support.v4.app.FragmentManager;
- import android.util.Log;
- import android.view.LayoutInflater;
- import android.view.View;
- import android.view.ViewGroup;
- import android.widget.Button;
- import static com.fragmentactivityproject.R.layout.second;
- /**
- * Created by vivek on 11/14/13.
- */
- @TargetApi(Build.VERSION_CODES.HONEYCOMB)
- public class Second extends Fragment {
- Button button1;
- public View onCreateView(LayoutInflater inflater,ViewGroup container,Bundle savedInstanceState)
- {
- View view;
- view = inflater.inflate(R.layout.second,null);
- return view;
- }
- }
Step 6
Android Manifest.xml file
- <?xml version="1.0" encoding="utf-8"?>
- <manifest xmlns:android="http://schemas.android.com/apk/res/android"
- package="com.fragmentactivityproject"
- android:versionCode="1"
- android:versionName="1.0" >
- <uses-sdk
- android:minSdkVersion="7"
- android:targetSdkVersion="16" />
- <application
- android:allowBackup="true"
- android:icon="@drawable/ic_launcher"
- android:label="@string/app_name"
- android:theme="@style/AppTheme" >
- <activity
- android:name="com.fragmentactivityproject.MainActivity"
- android:label="@string/app_name" >
- <intent-filter>
- <action android:name="android.intent.action.MAIN" />
- <category android:name="android.intent.category.LAUNCHER" />
- </intent-filter>
- </activity>
- </application>
- </manifest>
Step 7
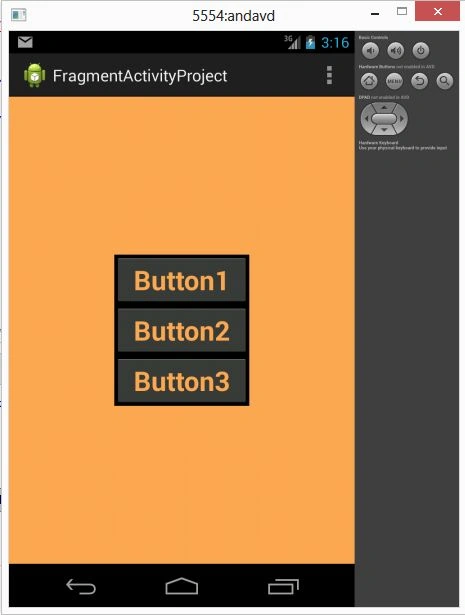
Image that contains your Layout:
Join the conversation! Your thoughts help the community grow.