

Introduction
There are various types of project templates available in the Visual Studio 2013. The ASP.NET Web API project template is one of them. The following is the list of ASP.NET project templates that are available in Visual Studio 2013:
- ASP.NET Empty Project Template
- ASP.NET Web Forms Project Template
- ASP.NET MVC Project Template
- ASP.NET Web API Project Template
- ASP.NET Single Page Application Project Template
- ASP.NET Facebook Project Template
- ASP.NET Windows Azure Mobile Services Project Template
If we describe the ASP.NET WEB API, then HTTP is the most powerful platform for creating a Web API. We can broadcast the service and data with the use of the Web API. The use of HTTP is very easy and formative. As we know, every platform can understand the HTTP so that it can be accessible from everywhere like applications created on desktops, mobiles as well as browsers. Therefore, we can say that the ASP.NET Web API is a framework for building Web APIs on top of the .NET Framework.
I am creating an article series in which I am using the ASP.NET Web API 2 that is the latest version of the Web API. We'll create the application using the ASP.NET Web API and use the Entity Framework 6 in the application for communicating with the database. Entity Framework 6 is the latest version of Entity Framework. I am using the latest version of both the oftechnologies, the ASP.NET Web API and the Entity Framework in here.
The ASP.NET Web API Project Template is based on web applications and uses the Single Page Application (SPA) design. SPA design based apps load a single HTML page and then dynamically updates the page. This app communicates with the server using the AJAX requests. While requesting using AJAX, it returns the JSON data that modifies the application user interface.
This article explains:
- ASP.NET Web API Applications
- Use of the Entity Framework
- The ADO.NET Entity Data Model
- Web API 2 Controllers
Prerequisites
All Project Templates that are defined above run on the Visual Studio 2013. Since we are learning the ASP.NET Web API, we require the following prerequisites:
- Visual Studio 2013
- ASP.NET Web API
Getting Started
So, let's proceed with the following sections:
- Create ASP.NET Web Application
- Installing Entity Framework
- Adding ADO.NET Entity Data Model
- Adding Web API 2 Controller
Create ASP.NET Web Application
In this section, we'll create the ASP.NET Web Application that is based on the Web API project template. Use the following procedure:
Step 1
Open Visual Studio 2013 and click on New Project.
Step 2
Select the ASP.NET Web Application and enter the name for the application.
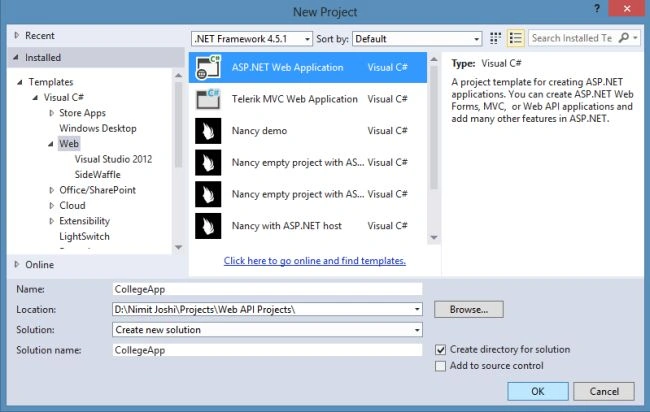
Step 3
In the next One ASP.NET wizard, select the Web API project template.
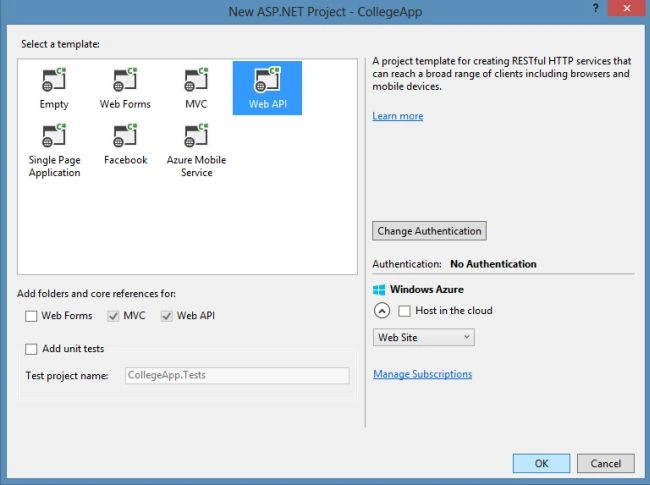
You can see that the Web API and MVC references are added to this project automatically. Leave the Windows Azure section and click on OK.
Visual Studio automatically creates the application in which you can find the Models and Controllers folder are already added.
Installing Entity Framework
We'll work with the latest version of Entity Framework which is Entity Framework version 6. If your app has the EF6 installed already then you can skip this. Otherwise we can easily install this using the NuGet Gallery. Review the following procedure.
Step 1
Open the Package Manager Console from "Tools" -> "NuGet Package Manager" -> "Package Manager Console".
Step 2
Enter the following command to install:
Install-Package EntityFramework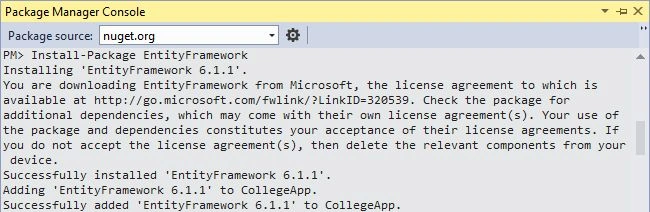
As you can see that the EntityFramework 6.1.1 package is installed on the application.
Adding ADO.NET Entity Data Model
In this section, we'll add an ADO.NET Entity Data Model to add a Model. We can create a simple class in here. I have created the database and tables in the back end and now I'll add them in the Models folder using the following procedure.
Step 1
In the Solution Explorer, right-click on the Models folder and go to Add and click on the ADO.NET Entity Data Model.
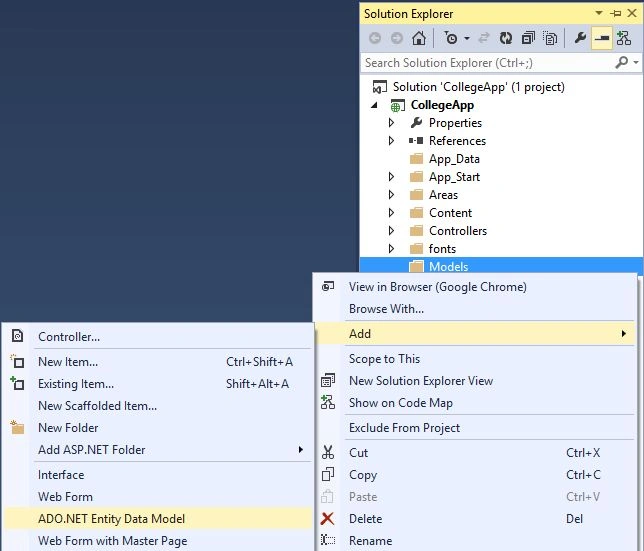
Step 2
Specify the name for the model and click OK.
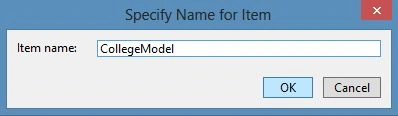
Step 3
Select the option to generate the database and click on "Next".
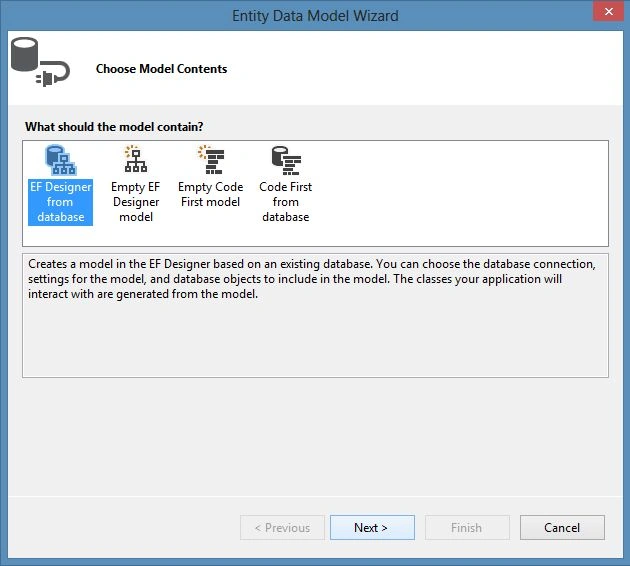
Step 4
Define the connection and specify the connection string name and click on "Next".
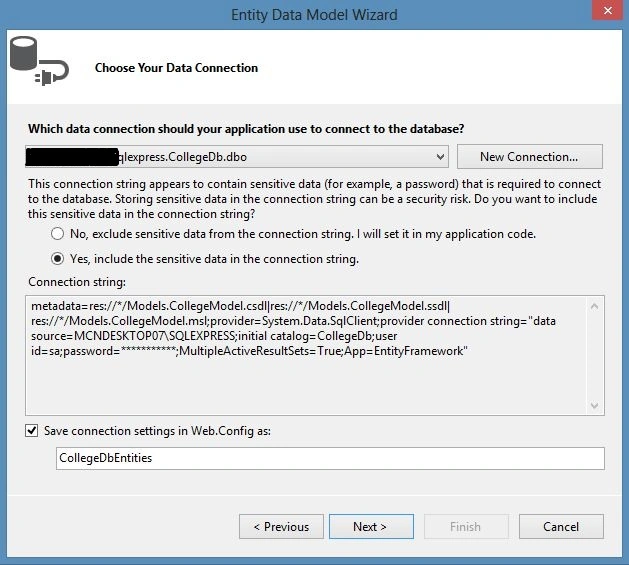
Step 5
Select the database objects from the next wizard and click on Finish.
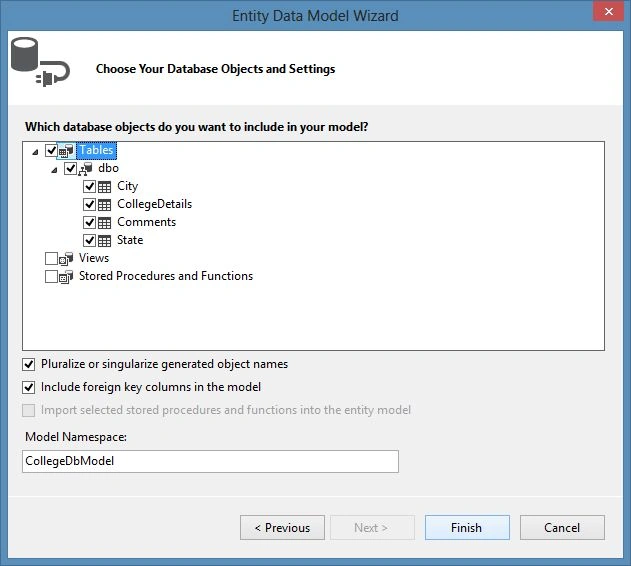
Now the model has been added to the application. The classes for every table are created in the models folder.
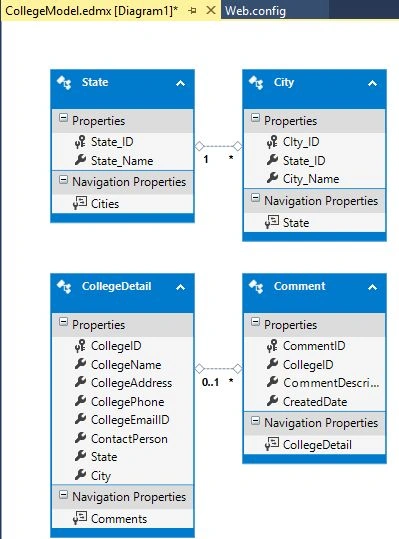
Note: I have used the ADO.Net Entity Data Model for working on a model. You can simply add classes to the Models folder.
Adding Web API 2 Controller
So far the model has been added to the application and now we need a Web API Controller to communicate with the model. In this section we'll add the Web API Controller with the Entity Framework. Just use the following procedure.
Step 1
In the Solution Explorer, right-click on the Controllers folder and go to Add and click on Controller.
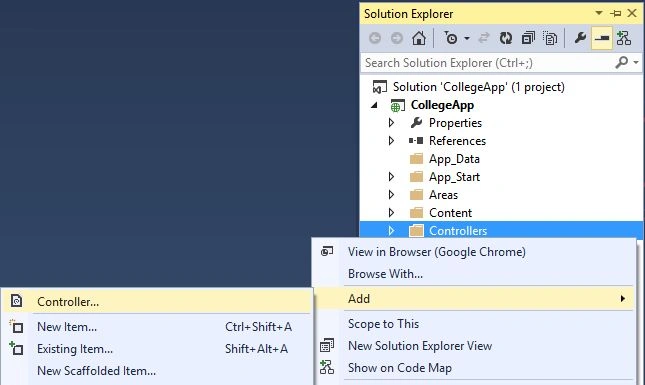
Step 2
In the next Add Scaffold wizard, select the Web API 2 Controller using Entity Framework and click on Add.
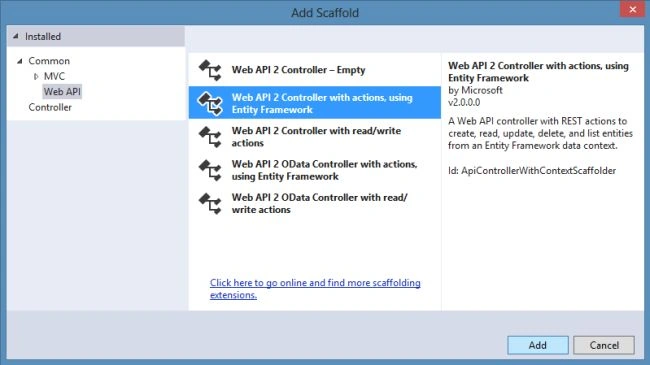
Step 3
Define the Model Class and for the Data Context class click on the Add button.
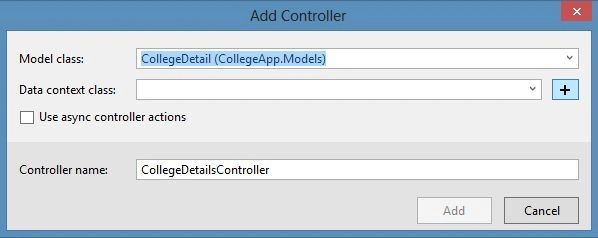
Step 4
Enter the name for new Data Context and click on Add.
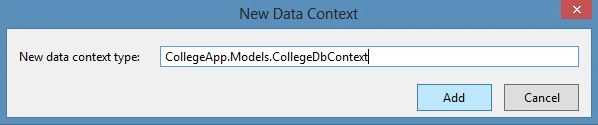
Step 5
Tick the checkbox for Use async controller actions and click on Add.
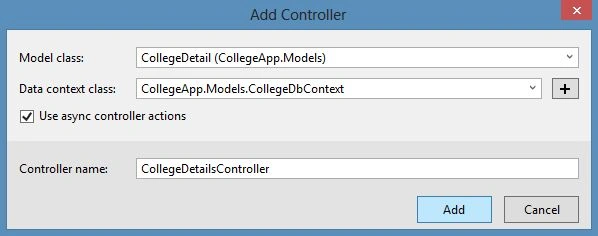
After this, using Scaffolding generates the controller and creates the data context class in the models folder. Have a look:
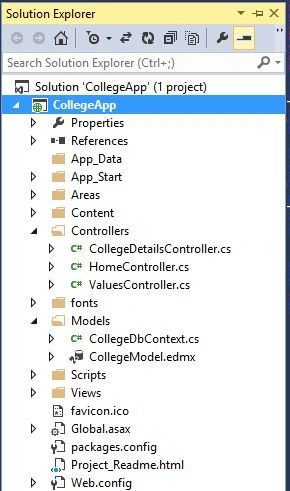
The following is the class structure of Controller Class and Data Context Class.
CollegeDetailsController Class:
- using System.Data.Entity;
- using System.Data.Entity.Infrastructure;
- using System.Linq;
- using System.Net;
- using System.Threading.Tasks;
- using System.Web.Http;
- using System.Web.Http.Description;
- using CollegeApp.Models;
- namespace CollegeApp.Controllers
- {
- public class CollegeDetailsController : ApiController
- {
- private CollegeDbContext db = new CollegeDbContext();
- // GET: api/CollegeDetails
- public IQueryable<CollegeDetail> GetCollegeDetails()
- {
- return db.CollegeDetails;
- }
- // GET: api/CollegeDetails/5
- [ResponseType(typeof(CollegeDetail))]
- public async Task<IHttpActionResult> GetCollegeDetail(int id)
- {
- CollegeDetail collegeDetail = await db.CollegeDetails.FindAsync(id);
- if (collegeDetail == null)
- {
- return NotFound();
- }
- return Ok(collegeDetail);
- }
- // PUT: api/CollegeDetails/5
- [ResponseType(typeof(void))]
- public async Task<IHttpActionResult> PutCollegeDetail(int id, CollegeDetail collegeDetail)
- {
- if (!ModelState.IsValid)
- {
- return BadRequest(ModelState);
- }
- if (id != collegeDetail.CollegeID)
- {
- return BadRequest();
- }
- db.Entry(collegeDetail).State = EntityState.Modified;
- try
- {
- await db.SaveChangesAsync();
- }
- catch (DbUpdateConcurrencyException)
- {
- if (!CollegeDetailExists(id))
- {
- return NotFound();
- }
- else
- {
- throw;
- }
- }
- return StatusCode(HttpStatusCode.NoContent);
- }
- // POST: api/CollegeDetails
- [ResponseType(typeof(CollegeDetail))]
- public async Task<IHttpActionResult> PostCollegeDetail(CollegeDetail collegeDetail)
- {
- if (!ModelState.IsValid)
- {
- return BadRequest(ModelState);
- }
- db.CollegeDetails.Add(collegeDetail);
- await db.SaveChangesAsync();
- return CreatedAtRoute("DefaultApi", new { id = collegeDetail.CollegeID }, collegeDetail);
- }
- // DELETE: api/CollegeDetails/5
- [ResponseType(typeof(CollegeDetail))]
- public async Task<IHttpActionResult> DeleteCollegeDetail(int id)
- {
- CollegeDetail collegeDetail = await db.CollegeDetails.FindAsync(id);
- if (collegeDetail == null)
- {
- return NotFound();
- }
- db.CollegeDetails.Remove(collegeDetail);
- await db.SaveChangesAsync();
- return Ok(collegeDetail);
- }
- protected override void Dispose(bool disposing)
- {
- if (disposing)
- {
- db.Dispose();
- }
- base.Dispose(disposing);
- }
- private bool CollegeDetailExists(int id)
- {
- return db.CollegeDetails.Count(e => e.CollegeID == id) > 0;
- }
- }
- }
CollegeDbContext Class:
- using System.Data.Entity;
- namespace CollegeApp.Models
- {
- public class CollegeDbContext : DbContext
- {
- public CollegeDbContext() : base("name=CollegeDbContext")
- {
- }
- public System.Data.Entity.DbSet<CollegeApp.Models.CollegeDetail> CollegeDetails { get; set; }
- public System.Data.Entity.DbSet<CollegeApp.Models.Comment> Comments { get; set; }
- }
- }
That's it in the Day 1 article.
Summary
This article described how to create the ASP.NET Web API application. We learned to add an ADO.NET Entity Data Model and Controller using the Entity Framework in the application. In the next part, we'll perform the operations on the database. Thanks for reading.
raji vidyaPosted Aug 29, 2018, 4:04 AM
Nimit Joshi Can you please give the link of next part?
V CPosted Jun 13, 2017, 10:55 PM
How can programmatically change connection string based on login? for example, there is a drop down to select "live", "staging", and "dev". When user select one of the option with login detail. it will connect and access to the right database.
Sr KarthigaPosted Feb 21, 2016, 11:19 PM
nice one
Sr KarthigaPosted Feb 21, 2016, 11:19 PM
Nice explanation
vinayPosted Feb 5, 2016, 6:22 AM
Hi Nimit, very nice article. Thanks for sharing. Can you provide next link in the series?
VIsweswara RaoPosted Aug 5, 2015, 8:33 AM
Hi, Can you provide next links in series
Tom RyanPosted Jun 11, 2015, 9:10 AM
Hi nimit when i follow this article but using 2 of my own db tables i get a lot of "'EntityType 'tablename' has no key defined. Define the key for EntityType." I have two tables, the first with a primary key (PLUID) and the second with a primary key (PLUID) and a foreign key to the first table. Am i missing something?
Andreas EllerbrockPosted Feb 26, 2015, 12:01 AM
What is the point of creating CollegeDbEntities if you will not use it in the dbContext?
Manish Kumar ChoudharyPosted Dec 12, 2014, 5:57 AM
Nice one Nimit Joshi sir..
Shivom BhattPosted Dec 12, 2014, 5:52 AM
Hello nimit, I have one query in WEB API using EF 6, is it possible to show the data from database into particular webform in using EF 6 web api 2 controller ?